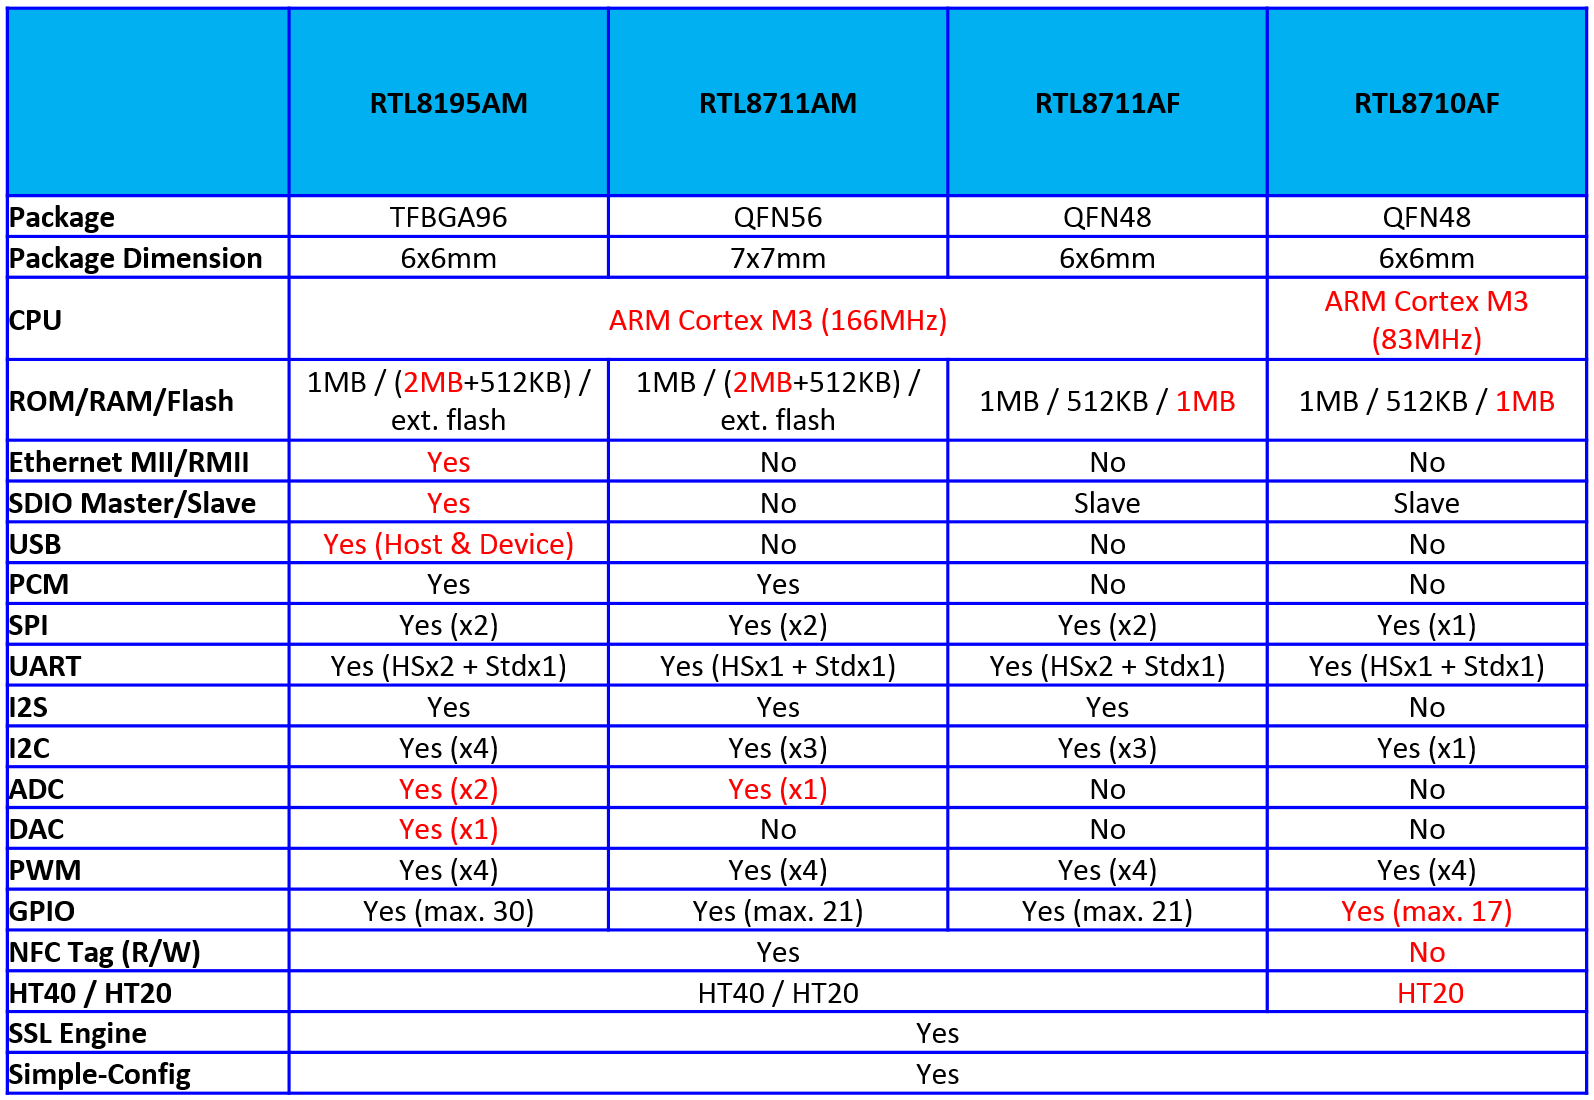
:::: MENU ::::
Browsing posts in: Open Source Hardware

Mac OS에서 ESP8266 개발 환경

아두이노

1. Arduino > Preferences… 의 메뉴에서 추가적인 보드매니저 URLs에 다음의 링크를 입력한다.

http://arduino.esp8266.com/stable/package_esp8266com_index.json

2. 툴 > 보드 > 보드 매니저… 의 메뉴의 필터에 ESP를 입력 후 esp8266을 선택후 설치한다.

Sming

맥에서는 https://github.com/SmingHub/Sming/wiki/MacOS-Quickstart 이 링크의 내용대로 따라하면 별 무리가 없다. 즉 이클립스, 툴체인, ESP SDK를 설치하고 Sming core를 빌드한다.

이클립스의 환경설정에서 SMING_HOME, ESP_HOME 설정을 한다.


SmingFramework의 Makefile-project.mk파일에서 ESPTOOL2의 경로를 다음과 같이 수정한다.

ESPTOOL2 ?= /opt/esp-open-sdk/utils/esptool2

Makefile-macos.mk파일에서 ESPTOOL의 경로를 다음과 같이 수정하고, COM_PORT항목도 환경에 맞게 수정한다.

ESPTOOL ?= $(ESP_HOME)/utils/esptool.py

Basic_Blink 프로젝트의 Makefile-user.mk파일도 다음과 같이 수정한다.

# Local build configuration

## Parameters configured here will override default and ENV values.

## Uncomment and change examples:

## Add your source directories here separated by space

MODULES = app

EXTRA_INCDIR = include

## ESP_HOME sets the path where ESP tools and SDK are located.

## Windows:

# ESP_HOME = c:/Espressif

## MacOS / Linux:

ESP_HOME = /opt/esp-open-sdk

## SMING_HOME sets the path where Sming framework is located.

## Windows:

# SMING_HOME = c:/tools/sming/Sming

## MacOS / Linux

SMING_HOME = /opt/sming/Sming

## COM port parameter is reqruied to flash firmware correctly.

## Windows:

# COM_PORT = COM3

## MacOS / Linux:

COM_PORT = /dev/tty.usbserial-A50285BI

## Com port speed

COM_SPEED= 115200

## Configure flash parameters (for ESP12-E and other new boards):

SPI_MODE = dio

## SPIFFS options

#DISABLE_SPIFFS = 1

SPIFF_FILES = files

Sming 프레임워크 소스코드를 불러와서 라이브러리를 빌드

  • Eclipse 실행
  • [File -> Import -> General -> Existing Project into Workspace] 선택
  • [Select root directory] 에서 SmingFramework 프로젝트 폴더를 선택
  • 프로젝트에서 Build

Blink 예제 빌드 확인

  • [File -> Import -> General -> Existing Project into Workspace] 선택
  • [Select root directory] Basic_Blink 프로젝트 폴더선택
  • 프로젝트에서 Build

프로젝트 빌드가 성공하면 [프로젝트 폴더\out\firmware] 폴더안에 *.bin 파일들이 생긴다.

참고


CREATOR Pro 보드 사용 및 분석

Rak Wireless사의 CREATOR Pro 보드는 Arduino Uno의 폼펙터를 가지며, RAK473 WiFi 모듈을 사용하고 NXP사의 LPC11U35를 사용해서 mbed에서도 프로그래밍이 가능하고, Arduino에서도 프로그래밍이 가능하다. WiKi에 나온 이 제품의 정보는 다음과 같은데, Realtek사의 Ameba RTL8710보드와 거의 동일하다.

CREATOR is a programmable platform for developing all kind of IoT applications. CREATOR is equiped with various peripheral interfaces, including Wifi, GPIO, I2C, UART, PWM, ADC. Through these interfaces, CREATOR can connect with electronic components such as LED, switches, manometer, hygrometer, PM2.5 dust sensors etc.
The collected data can be uploaded via WiFi, and be utilized by applications on smart devices to realize IoT implementation.
CREATOR and Arduino Uno have similar size, and the pins on CREATOR are compatible with Arduino Uno. CREATOR uses Micro USB to supply power, which is common in many smart devices.
Currently, CREATOR currently supports Windows XP/7/8 32 and 64 bits and MAC OS operating systems. In this example, please use Arduino IDE with version 1.6.7 or later.

LPC11U35의 역할

  • CMSYS-DAP가 내장
  • RAK473를 프로그래밍 및 디버깅이 가능하게 함
  • CMSYS-DAP 펌웨어는 JTAG을 통해서 업로드하고, 이후에는 CRP-DISABLED에 파일을 Copy하면 된다. 문제는 Mac에서 파일을 카피하면 안되고 윈도우즈에서만 된다. 관련자료
  • Tindie에서 $15에 판매하는 같은 기능을 갖는 외장형 보드

RAK473

Rak 홈페이지의 자료 및 Github의 자료

아두이노 개발 환경에서 사용법

추가적으로 함께 보면 좋은 자료


Adafruit 관련 정보

2005년에 설립된 Adafruit 이야기

Adafruit is now a highly successful community-driven electronics company, educational resource, and maker community thriving in SoHo, Manhattan.

Description

Online learning resource, marketplace, and maker community for do-it-yourself electronics

Technical Data

  • Adafruit employs 105 people in their 50,000-sq.-ft. factory in Manhattan
  • 100% woman owned, no loans, no venture capital
  • Recorded $45 million in revenue in 2016
  • Received its millionth order in January 2016
  • 14 million website page views and over 2 million uniques a month
  • 34 million YouTube views and over 207,000 subscribers
  • Social media reach: 119,000+ Twitter followers, 2.1 million followers on G+ (4 million for Ladyada), 77,000 Facebook subscribers, 51,000 Instagram followers
  • Limor Fried was featured on the cover of Wired (April, 2011) and was named Entrepreneur of the Year by Entrepreneur magazine in 2012
  • Limor is a founding member of the NYC Industrial Business Advisory Council
  • Adafruit is ranked No. 11 among the top 20 U.S. manufacturing companies, No.1 in New York City by Inc. magazine, and is listed among Inc.’s 5000 “fastest growing private companies”
  • In 2016, Limor was named one of the White House’s “Champions of Change”

Features

Adafruit’s 10 Most Popular Products

  1. Adafruit Ultimate GPS Breakout — 66 channel w/10 Hz updates
  2. Adafruit Motor/Stepper/Servo Shield for Arduino v2 Kit
  3. PowerBoost 1000 Charger — Rechargeable 5V Lipo USB Boost @ 1A
  4. Circuit Playground — Integrated microcontroller and sensor board
  5. PiTFT Plus 480×320 3.5″ TFT+Touchscreen for Raspberry Pi
  6. Adafruit 9-DOF Absolute Orientation IMU Fusion Breakout — BNO055
  7. Adafruit Feather HUZZAH with ESP8266 WiFi
  8. Adafruit Feather 32u4 Basic Proto
  9. Adafruit Feather 32u4 Bluefruit LE
  10. Adafruit Pro Trinket — 5V 16 MHz

[*Source: Adafruit product stats 2/18/17]

Applications

Ladyada’s 10 Lessons for Building Open Culture Companies

  • You can be a good company and a good business.
  • Open source isn’t a business or a marketing strategy for us, it’s the DNA of our company, it’s part of what we do.
  • Metrics — if you’re not measuring things, you cannot improve them.
  • We have a weekly all-company meeting called “State of the Fruit.” Be transparent with all parts of your business, early and often.
  • Skills can be taught. Good people making good decisions should be the focus and what is celebrated.
  • Celebrate others. It’s not just about you and your products.
  • Traveling takes too much time. Use the power of the internet. Publish frequently, from videos to blog posts.
  • Say no to things. It’s not about what you can do, it’s more about what you will not do.
  • Get a good trademark lawyer. If you’re open source, you’re giving away everything but your name, it’s important to protect it.
  • You do not need a fancy office or building to do great work. Great work can happen anywhere, even in an apartment.

출처: http://makezine.com/2017/06/13/open-source-ideals-engineering-genius-helm-adafruit-maker-revolution-manufacturing/


오픈소스하드웨어 인증 프로그램 – OSHW Certification Program

오픈소스하드웨어협회에서 2015년 부터 작업한 오픈소스하드웨어 인증 프로그램을 개시했다. 이 인증은 오픈소스하드웨어 정의를 따른 다면 받을 수 있는 인증이고, 인증을 받은 이후에 여기서 벗어난다면 패널티가 있다.

관련 자료 – http://www.oshwa.org/2016/10/07/announcing-the-oshwa-open-source-hardware-certification-program/


Cura 2.1 open beta 버전 빌드

Ultimaker에서 기존 Cura와 다른 GUI를 가진 Cura를 개발해서 베타버전을 내놓았다. 이유는

This is the new, shiny frontend for Cura. daid/Cura is the old legacy Cura that everyone knows and loves/hates.
We re-worked the whole GUI code at Ultimaker, because the old code started to become a unmaintainable

사실 daid의 Cura의 경우 맥에서의 빌드는 본인도 hell이라고 표현을 하는데, 이번 베타버전의 큐라를 빌드해 보니 스무스하게 빌드가 된다. 단 빌드 시간은 엄청나게 오래 걸린다.

Mac에서의 빌드 방법

필요한 파일들 설치

  • xcode 설치
  • cmake 설치 – brew install cmake
  • openssl 설치 – brew install openssl
  • brew link openssl –force
  • gcc 설치 – brew install gcc

빌드

  • git clone [email protected]:Ultimaker/cura-build.git
  • cd cura-build
  • mkdir build
  • cd build
  • cmake ..
  • make

추가적인 머신 설정 방법

Json 파일을 만들어야 하는데, 맥에서의 파일 위치는 /Users/AteamRnd/Downloads/Cura.app/Contents/Resources/cura/resources/machines

베타버전의 메뉴얼

다른 OS에서의 빌드는 링크를 참고.

관련 내용: https://ultimaker.com/en/resources/20511-change-machine-settings


아두이노에서 ESP8266 사용하기

아두이노에서 ESP8266 사용하기

  • 아두이노 IDE는 1.6.4 이상의 버전을 설치
  • 아두이노의 환경설정에서 추가적인 보드매니저 URLs에 다음과 같이 입력

http://arduino.esp8266.com/stable/package_esp8266com_index.json

  • 툴 > 보드매니저에서 ESP8266을 검색후 ESP8266 보드를 설치한다.

arduino_board_maneger

  • 설치후 툴 > 보드 메뉴에서 가지고 있는 ESP8266보드를 선택한다.

핀레이아웃

간단한 Blink Test


아두이노의 숨겨진 히스토리

이제껏 몰랐던 아두이노의 숨겨진 이야기 http://arduinohistory.github.io/

이 글의 저자는 Hernando Barragán로 아두이노가 차용한 Wiring을 개발한 사람이다. 이 이야기의 핵심은 자신이 학생으로 있을 때 개발한 wiring을 당시 교수로 있었던 Massimo Banzi가 fork해서 아두이노를 만들었다는 것. 잘못된 정보는 무책임한 미디어에 의해 더 확산이 되고… 암튼 당사자가 주장하는 얘기의 핵심은

It is unethical and a bad example for academics to do something like this with the work of a student. Educators, more than anybody else, should avoid taking advantage of their student’s work.


Make파일을 사용해서 아두이노 스케치 다운로드

아두이노 IDE를 사용하여 스케치를 다운로드를 하면 매번 컴파일을 해서 시간이 걸린다. 따라서  Make파일을 써서 스케치를 다운로드하고 있었는데, UART to USB칩이 Atmega16U2, FTDI에서는 이상이 없었는데, Silab CP2102를 사용하면 다운로드가 안된다. 원인을 찾아보니 Make파일에서 다음과 같이 AVRDUDE_PROGRAMMER를 stk500대신 wiring으로 하니 다운로드가 잘된다.

#AVRDUDE_PROGRAMMER ?= stk500
AVRDUDE_PROGRAMMER ?= wiring

CP2102 드라이버CP2102데이터시트


Teensy 사용하기

Teensy는 아두이노 호환 보드로 Cortex M0, M4기반의 보드가 있어서 보다 높은 프로세싱이 필요한 응용에 적합하다. 이 보드를 사용하기 위해서는 Teensyduino라는 프로그램을 설치해야 하는데, 이것은 기존 아두이노 IDE에 추가적으로 설치되는 코드들과 다운로드를 위한 프로그램이 포함되어 있다.

Teensy_USB_Development_Board_1

Teensy_USB_Development_Board

먼저 아두이노를 설치하고 https://www.pjrc.com/teensy/td_download.html 이 사이트에서 파일을 다운로드해서 설치하는데 문제는 아두이노 1.0과 아두이노 1.6.x 이 동시에 설치가 되어 있으면 아두이노 1.0쪽에만 설치가 된다.(아두이노 1.6.x쪽을 지정이 안됨) 따라서 일단 아두이노 1.0을 언인스톨하고 1.6.x에 설치를 한 후 다시 아두이노 1.0을 설치를 해야 한다. Teensy 3.2의 경우 Cortex M4이기 때문에 SPI를 사용하는 응용은 Teensy 라이브러리에서 SPI 드라이버(faster SPI library for Teensy 3.0)도 같이 설치를 해야한다. 그리고 나머지 필요한 라이브러리는 아두이노 1.6.x의 라이브러리 매니저에서 추가한다.

*코드중에 호환이 안되는 것중 하나 – isDigit ==> isdigit 으로 바뀌어야 함.