My Mini Factory에서 정리한 3D 프린터를 위한 3D 모델링 툴, 소프트웨어 정리

 0 comments 0 comments
 회사에서 개발하고 있는 Waggle, IoT device for 3D Printer의 킥스타터 크라우드 펀딩 종료.

0 comments 참고: http://www.sailfishfirmware.com/doc/details-s3g-and-x3g.html#x52-1340009.3
0 comments 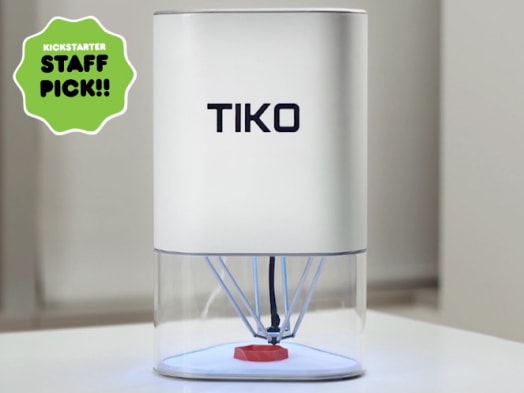
몇년전 킥스타터에서 펀딩에 성공한 프로젝트인 TIKO 3D프린터가 회사를 닫는다고 공지를 했다. 제품은 겨우 4천대 정도 미주지역에 배송을 했고, 전세계에 배송할 수만대분을 포기한 상태이다. 기술적인 혁신을 통해 비용을 줄여서 매우 값싼 3D 프린터를 개발한다고 되어 있었는데, 내용을 보니 기술적으로 해결하지 못한 부분도 있고, 프로토타입이 검증이 되기 전에 펀딩금액으로 이미 부품들을 주문해 버리기도 했으니, 어쩌면 당연한 결과이다.
Look for a sub-group of users in your target market and focus on them
Most users care about what a product does, not how a product does it.
Focus on finding the single reason a customer would use this product and extend a limited feature set out of this single reason.
The best hardware startups iterate early and often by making multiple runs of small numbers of units as they hone in on the right product.
0 comments 여기서 Makerbot과 Prusa의 현재 상황과 3D 프린팅 시장을 알 수 있다.
consumers are incapable of 3D design, fixing wonky machines and desire 3D models that aren’t easily found
그래서 시장은 아직 일반인 대상이 아니라 DIY community인데, 이쪽을 포커싱하고 있는 Prusa의 경우 90명 정도의 스텝이 월 3천대 이상을 판매한다고 함.
0 comments 
Ultimaker 3의 특징 – Ultimaker 3 Spec.
Ultimaker 3 내부 구성
A20 LIME2 Linux보드 & ATmega 보드
위 블럭다이어그램에서 보듯이기존 UM2의 경우에는 메인보드에 ATmega2560칩이 있었으나, UM3는 Connectivity를 추가하기 위해 A20 LIME2 Linux보드가 메인이 되고, 기존의 Atmega보드는 실시간 처리가 필요한 모터제어에만 사용이 되었다. 이 보드에 카메라 및 WiFI, Ethernet, USB Host, NFC 리더가 있는데, NFC리더는 필라멘트에 붙어 있는 NFC 테그를 태깅하기 위해 사용이 된다. WiFi의 경우 USB to WiFI 동글이 사용되는데, 앱을 확인해 보니 Local network에서만 사용이 된다.
프린터 헤드 보드
레벨링을 위한 센서 / 쿨링팬 / LED 제어 / 노즐의 온도 컨트롤 및 사용시간 체크를 위한 EEPROM이 있다.
네트웍을 통한 원격제어
REST API를 사용해서 원격 제어가 가능하다. 즉 http://10.180.1.209/api/v1/system/hostname 이런 형태로.. 관련 내용은 https://ultimaker.com/en/community/23283-inside-the-ultimaker-3-day-2-remote-access-part-1 에서 확인할 수 있다.
참고자료
0 comments S3G protocol
구성 및 통신
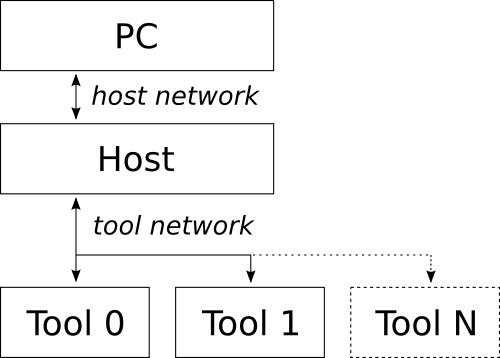
2가지 네트워크로 구성이 된다.
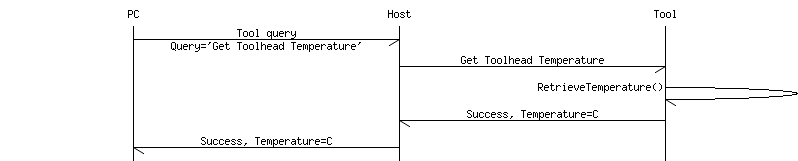
에러 방지를 위해 매 패킷의 마지막에 CRC를 사용
6 comments | Software | User | Price | OS |
|---|---|---|---|
| 3DPrinterOS | Beginners, Advanced Users | Freemium | Browser, Windows, Mac |
| Astroprint | Beginners, Advanced Users | Freemium | Browser, Raspberry Pi, pcDuino |
| Craftware | Beginners, Advanced Users | Free | Windows, Mac |
| Cura | Beginners, Advanced Users | Free | Windows, Mac, Linux |
| IceSL | Advanced Users | Free | Windows, Linux |
| KISSlicer | Beginners, Advanced Users | Free/$35 | Windows, Mac, Linux, Raspberry Pie |
| MakerBot Print | Beginners | Free | Windows, Mac |
| MatterControl | Beginners, Advanced Users | Free | Windows, Mac, Linux |
| Netfabb Basic | Intermediate Users, Advanced Users | Free | Windows, Mac, Linux |
| OctoPrint | Intermediate Users, Advanced Users | Free | Raspberry Pi, Windows, Mac Linux |
| Repetier | Intermediate Users, Advanced Users | Free | Windows, Mac Linux |
| Simplify3D | Beginers, Advanced Users | $150 | Windows, Mac |
| Slic3r | Advanced Users, Professional Users | Free | Windows, Mac Linux |
| SliceCrafter | Advanced Users | Free | Browser |
| Tinkerine Suite | Beginners | Free | Windows, Mac |
| Z-Suite | Beginners | Free | Windows, Mac |
0 comments 0 comments Reprap 기반의 코드에 적용되어 있는 PID 를 튜닝하는 방법은 다음과 같이 PID Auto-tune을 사용해서 상수값 Kp, Ki, Kd값을 정하고 Configuration.h에 설정을 한다.
M303 E0 S210 C8
위 코드의 의미는 타겟온도 210도로 하고 8번의 사이클을 거쳐서 값을 정하는것. 그러면 다음과 같이 값이 나온다.
bias: 92 d: 92 min: 196.56 max: 203.75
Ku: 32.59 Tu: 54.92
Clasic PID
Kp: 19.56
Ki: 0.71
Kd: 134.26
PID Autotune finished ! Place the Kp, Ki and Kd constants in the configuration.h
Configuration.h 파일에 설정후 컴파일을 하는 대신에 다음과 같이 M301커멘드로 테스트가 가능하다.
M301 P19.56 I0.71 D134.26
PID Auto-tune
Kp, Ki, Kd의 의미
수동으로 조정
참고