Stm32Cube와 Eclipse의 조합으로 개발을 할때 연결된 보드를 디버깅시 다음과 같은 에러 메시지가 뜰 경우가 있다.

이럴때는 프로젝트의 설정의 Run/Debug Setings의 Startup 탭에서 다음 그림에 보이는 2가지 항목의 설정을 해제하면 된다.

Stm32Cube와 Eclipse의 조합으로 개발을 할때 연결된 보드를 디버깅시 다음과 같은 에러 메시지가 뜰 경우가 있다.

이럴때는 프로젝트의 설정의 Run/Debug Setings의 Startup 탭에서 다음 그림에 보이는 2가지 항목의 설정을 해제하면 된다.


임베디드 보드에서의 Hello World인 blink 테스트를 끝나면 printf를 찍기위해 UART를 연결하고 테스트를 한다. Nucleo 보드에서도 마찬가지로 작업을 하는데, 회로도를 보면 아두이노 핀 호환 컨넥터의 TX, RX핀에 연결이 되어있다. 하지만 자세히 회로도를 보면 default 연결은 이 핀들이 아니라 ST-Link칩에 연결이 되어 있다. 즉 UART2의 경우 ST-Link를 통해서 USB 컨넥터에 연결이되고 virtual COM port로 잡힌다. 매뉴얼에 보면 다음과 같이 나온다.
The USART2 interface available on PA2 and PA3 of the STM32 microcontroller can be connected to ST-LINK MCU, ST morpho connector or to Arduino connector. The choice can be changed by setting the related solder bridges. By default the USART2 communication between the target STM32 and ST-LINK MCU is enabled, in order to support virtual COM port for MbedTM (SB13 and SB14 ON, SB62 and SB63 OFF). If the communication between the target STM32 PA2 (D1) or PA3 (D0) and shield or extension board is required, SB62 and SB63 should be ON, SB13 and SB14 should be OFF. In such case it is possible to connect another USART to ST-LINK MCU using flying wires between ST morpho connector and CN3.
따라서 아두이노 핀 호환핀에 연결을 하려면 점퍼 설정을 다시해야 하는데, printf를 위해서라면 virtual COM port를 사용하면 되니 그럴 필요는 없다.
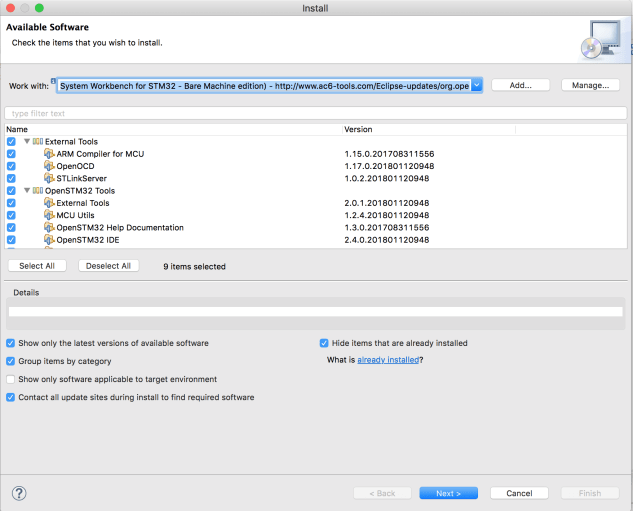
System Workbench for STM32를 설치하는 방법은 2가지이다. 인스톨 프로그램으로 설치하는 방법과 기존에 설치되어 있는 이클립스에 설치하는 방법이 있다.
chmod 755 install_sw4stm32.run then ./install_sw4stm32.run

문제는 이렇게 설치를 하다가 다음과 같은 에러메시지가 나오고 더 이상 진행이 되지 않는다.


#To disable
sudo spctl –master-disable
#To enable
sudo spctl –master-enable

USB device를 가진 MCU를 PC에 연결시 Mass Storage Device로 동작시키고, Hex파일을 copy하면 MCU의 application code가 업데이트 되는 형태.
3가지 유명한 보드
기타
32비트 보드

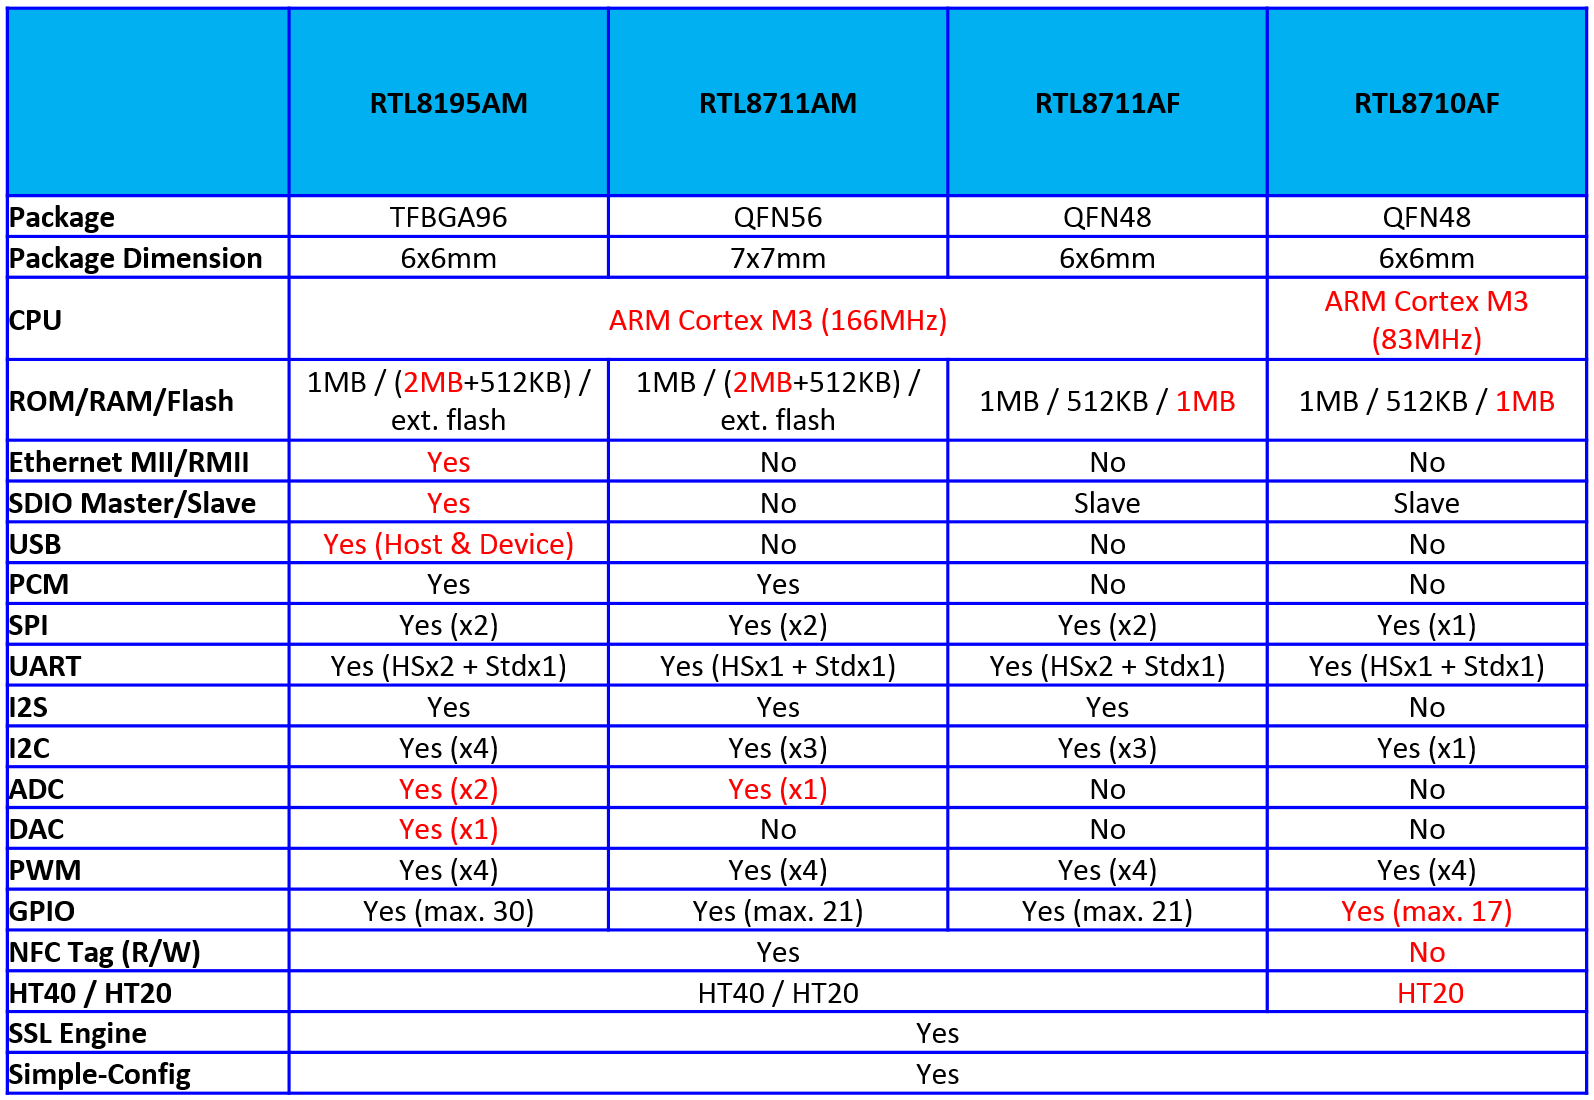
Rak Wireless사의 CREATOR Pro 보드는 Arduino Uno의 폼펙터를 가지며, RAK473 WiFi 모듈을 사용하고 NXP사의 LPC11U35를 사용해서 mbed에서도 프로그래밍이 가능하고, Arduino에서도 프로그래밍이 가능하다. WiKi에 나온 이 제품의 정보는 다음과 같은데, Realtek사의 Ameba RTL8710보드와 거의 동일하다.
CREATOR is a programmable platform for developing all kind of IoT applications. CREATOR is equiped with various peripheral interfaces, including Wifi, GPIO, I2C, UART, PWM, ADC. Through these interfaces, CREATOR can connect with electronic components such as LED, switches, manometer, hygrometer, PM2.5 dust sensors etc.
The collected data can be uploaded via WiFi, and be utilized by applications on smart devices to realize IoT implementation.
CREATOR and Arduino Uno have similar size, and the pins on CREATOR are compatible with Arduino Uno. CREATOR uses Micro USB to supply power, which is common in many smart devices.
Currently, CREATOR currently supports Windows XP/7/8 32 and 64 bits and MAC OS operating systems. In this example, please use Arduino IDE with version 1.6.7 or later.

LPC11U35의 역할
RAK473

Rak 홈페이지의 자료 및 Github의 자료
아두이노 개발 환경에서 사용법
추가적으로 함께 보면 좋은 자료
Segger사의 J-link 디버거는 JTAG과 SWD인터페이스를 제공한다.
JTAG pin-out

SWD를 사용하기위해서는 위 20핀에서 필요한 4핀만 연결하면 된다. 여기서 VTref신호는 디버거에서 타겟보드의 전압을 체크하고 전압레퍼런스로 사용하기 때문에 타겟 보드의 전원을 연결하고, 프로그래밍을 할 MCU의 전압과 연결해야 한다. 그렇지 않을 경우 VTref is 0.xxxxV라고 에러메시지가 나면서 연결이 되지 않는다.
*참고로 J-link와 같은 디버거를 DIY형태로 개발을 해서 OSHW로 판매를 하는 것이 있다. OSHChip_CMSIS_DAP_V1.0


BBC microbit를 오프라인에서 사용하려면 링크를 참고 하고 Manuall Installation 항목을 따라서 환경을 셋업한다.
1. yotta설치
Mac OS의 경우
brew tap ARMmbed/homebrew-formulae
brew install python cmake ninja arm-none-eabi-gcc
pip install yotta
Trouble shooting
brew 관련 아래과 같은 문제가 있을 경우
sudo chown -R $(whoami):admin /usr/local
cd $(brew –prefix) && git fetch origin && git reset –hard origin/master
터미널에서 다음과 같은 에러메시지가 나올때
error: connection error: (“bad handshake: Error([(‘SSL routines’, ‘ssl3_get_server_certificate’, ‘certificate verify failed’)],)”,)
pip install -U certifi
참고: https://github.com/ARMmbed/yotta/issues/744
2. Srecord 설치
brew install srecord
3. 예제 코드 받기
git clone https://github.com/lancaster-university/microbit-samples
cd microbit-samples
4. 타겟을 miccrobit로 설정
yt target bbc-microbit-classic-gcc
5. 프로젝트 빌드
yt build
6. 마이크로비트에 다운로드 하기
마이크로비트는 MICROBIT라는 이름의 외장디바이스로 되어 있으니 hex파일을 copy하면 된다.
cp ./build/bbc-microbit-classic-gcc/source/microbit-samples-combined.hex /Volumes/”MICROBIT”
참고
https://lancaster-university.github.io/microbit-docs/offline-toolchains/
http://yottadocs.mbed.com/#installing
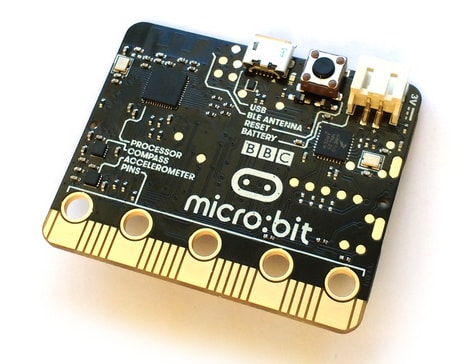
BBC micro:bit는 영국에서 컴퓨터 교육용으로 디자인된 마이크로컨트롤러 보드이다.

개발에 참여한 파트너사들
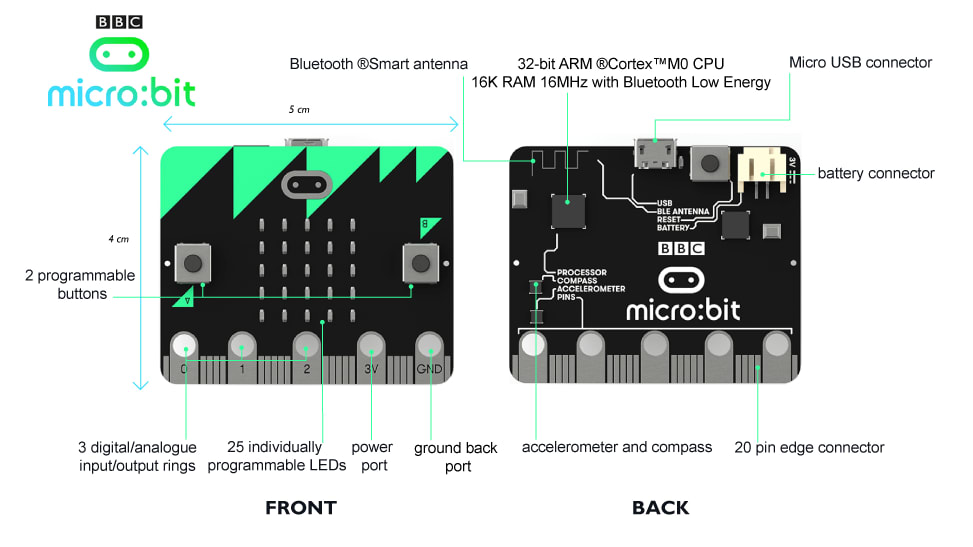
하드웨어

핀아웃

모두다 브라우저기반의 컴파일러를 제공하며, 난이도에 따라 아래 그림 처럼 3가지로 나뉠 수 있다.

아키텍처

기타
관련자료

“Help”->Check for Updates를 누르고, Processor Expert for Kinetis만 선택하고 업데이트 한다.
“Help” -> “Install New Software”를 선택하고 Add 버튼 > Archive 버튼을 눌러서 SDK 설치 폴더 아래 /tools/eclipse_update 폴더에서 KSDK_<version>_Eclipse_Update_zip file. 를 선택한다

“File->Import”를 선택후 “General”을 눌러서 “Existing Projects into Workspace”를 선택한다.
루트 디렉토리는 <install_dir>/lib/ksdk_platform_lib/kds/K82F25615 를 선택하고 finish를 클릭한다.
메뉴에 헤머 아이콘을 눌러 빌드한다.
<install_dir>/examples/frdmk82f/demo_apps/<demo_name>/kds 아래있는 데모 프로그램을 플랫폼 라이브러리 빌드 할때와 마찬가지로 빌드한다.
예를 들면 hello_world의 경우 <install_dir>/examples/frdmk82f/demo_apps/hello_world/kds
메뉴에 헤머 아이콘을 눌러 빌드한다.
FRDM-K82F는 기본적으로 mbed/CMSIS-DAP debug interface 가 설치가 되어있으므로 KDS에서 다운로드 디버깅을 하기위해서는 J-Link OpenSDAv2.1를 설치해야 한다. 리셋 버튼을 누른상태에서 “SDA USB” USB 포트를 연결해서 전원을 연결한다. 그러면 BOOTLOADER로 폴더가 잡힌다.
https://www.segger.com/opensda.html 여기에서 OpenSDA V2.1: Download JLink_OpenSDA_V2_1_2015-10-13.zip 을 다운로드후 압축을 풀고 bin파일을 BOOTLOADER 폴더에 넣으면 다시 JLINK라는 폴더로 잡힌다.
Run > Debug Configurations에서 맨 아래있는 GDB SEGGER J-Link를 선택하고 디버깅을 한다.
Hellow World의 경우 시리얼 터미널 설정은 115200. 보드의 전원 및 디버깅을 위해서 USB SDA 포트와 PC를 연결한다.