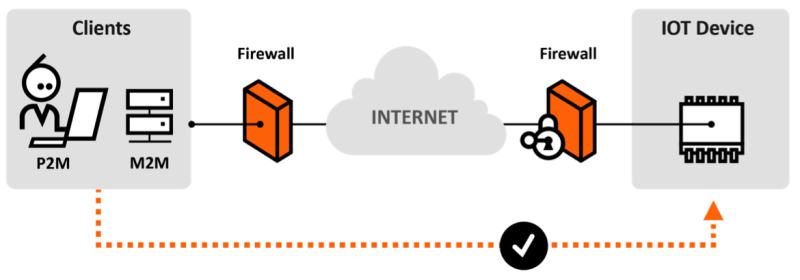
Nabto provides a full communication infrastructure to allow real-time direct, encrypted communication between end-user clients (tablets, smartphones, PC) and resource limited devices (< 1kb RAM and up) – the Nabto communication platform. The platform provides direct real-time connectivity with no firewall or dynamic IP hassle – just as you know from e.g. Skype™.

Nabto 사용법
Nabto 디바이스 포털 https://developer.nabto.com/) 에서 ID를 등록하고 Add Device에 디바이스 이름을 입력후 디바이스를 추가한다. 이 디바이스 ID는 xxxx.demo.nab.to 이런 형태가 된다.
그러면 디바이스의 status가 나오고 Key가 할당이 된다. 이 Key는 보안 연결에 사용이 되며 HTML-DD는 HTML Device Driver로 web GUI를 포함하는데 default를 사용한다.
uNabto SDK(unabto_sdk.zip)를 다운로드 후 압축을 풀고 다음과 같이 빌드를 한다.
cd unabto_sdk/unabto/apps/pc_demo/
cmake .
make
이렇게 하면 pc_demo 라는 실행파일이 생성이 되는데 다음과 같이 디바이스 이름과 Key를 입력하여 실행을 한다.
./pc_demo -d [xxxx.demo.nab.to] -s -k [KEY]
아래는 jbtest2.demo.nab.to로 실행을 한 결과인데 마지막에 연결 상태가 WAIT_GSP to ATTACHED가 되어야 한다.
16:47:23:876 unabto_main.c(41) Identity: ‘jbtest2.demo.nab.to’
16:47:23:876 unabto_main.c(42) Program Release 2.21889
16:47:23:876 unabto_main.c(43) Buffer size: 1500
16:47:23:876 unabto_common_main.c(127) Device id: ‘jbtest2.demo.nab.to’
16:47:23:876 unabto_common_main.c(128) Program Release 2.21889
16:47:23:879 unabto_app_adapter.c(698) Application event framework using SYNC model
16:47:23:885 unabto_context.c(55) SECURE ATTACH: 1, DATA: 1
16:47:23:885 unabto_context.c(63) NONCE_SIZE: 32, CLEAR_TEXT: 0
16:47:23:885 unabto_common_main.c(206) Nabto was successfully initialized
16:47:23:885 unabto_context.c(55) SECURE ATTACH: 1, DATA: 1
16:47:23:885 unabto_context.c(63) NONCE_SIZE: 32, CLEAR_TEXT: 0
16:47:23:886 unabto_attach.c(787) State change from IDLE to WAIT_DNS
16:47:23:886 unabto_attach.c(788) Resolving dns: jbtest2.demo.nab.to
16:47:24:411 unabto_attach.c(809) State change from WAIT_DNS to WAIT_BS
16:47:24:424 unabto_attach.c(292) Sending INVITE to Base Station: 1
16:47:24:725 unabto_attach.c(474) State change from WAIT_BS to WAIT_GSP
16:47:24:736 unabto_attach.c(303) Sending INVITE to GSP: 1
16:47:24:736 unabto_attach.c(266) ######## U_INVITE with LARGE nonce sent, version: – URL: –
16:47:25:084 unabto_attach.c(624) nmc.ctx.privat : 0.0.0.0:53538
16:47:25:085 unabto_attach.c(625) nmc.ctx.global : 210.113.20.1:53538
16:47:25:086 unabto_attach.c(573) GSP-ID(nsi): 3148170758
16:47:25:086 unabto_attach.c(575) State change from WAIT_GSP to ATTACHED
디바이스 포털에서 디바이스의 상태가 Offline에서 Online으로 바뀐 것을 볼 수 있다.
Nabto app이나 브라우져(브라우저는 IE나 Firefox만 지원하며 플러그인을 설치해야 한다.)에서 nabto://디바이스이름.demo.nab.to를 실행한다.

데모웹에서 스위치를 on/off하면 실행시킨 터미널에서 메시지를 볼 수 있다.
Arduino에서 테스트하는 방법
아두이노와 네트워크 연결을 위한 Ethenet 쉴드가 필요하다.
- Copy the unabto/apps/arduino/Nabto directory from the SDK to the Arduino libraries directory. On Windows it is normally located in My Documents\Arduino\libraries\ and on Mac/Linux it is located in ~/Documents/Arduino/libraries/.
- Open Arduino.
- Open Files → Examples → Nabto → Demo.
- Type in the MAC-address located on the bottom of the Ethernet shield.
- Specify an unique ID for the Arduino demo, e.g <macaddress>.sdk.u.nabto.net.
- Connect the LED to pin A0 (anode) and ground (cathode).
- Click on Tools → Board and make sure you have the right board chosen.
- Click upload.
- Open Firefox or Internet Explorer and type in the ID.


