:::: MENU ::::
Browsing posts in: Bluetooth

BLE over UART throughput

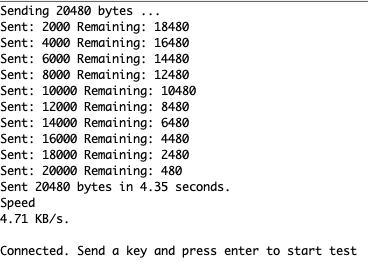
Adafruit사의 Feather m0 bluefruit 보드의 UART to BLE Throughput 측정. PC측에는 nRF Connect 앱인 BLE 앱을 사용함.

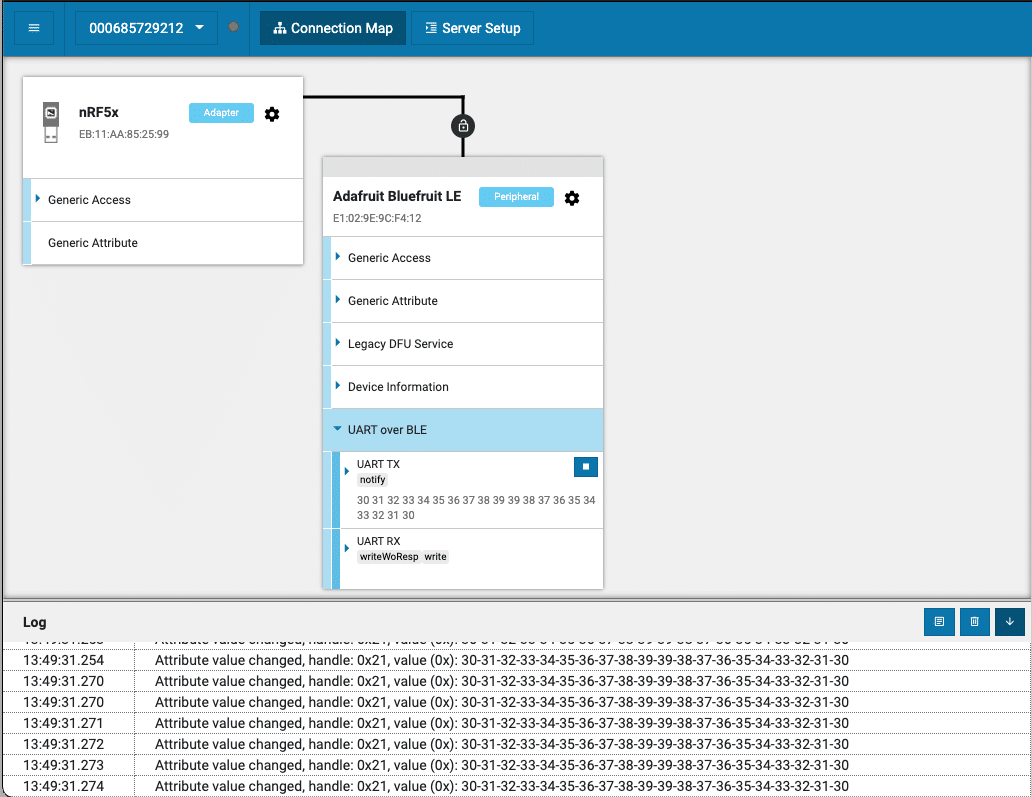
이 앱에서 연결을 하고 데이터를 수신한다. 보내는 측의 로그를 확인하면 대략 4.71KB/S 정도 나오는데, 핸드폰 앱에서 확인해보니 4KB/S 정도 나옴.

성능도 중요하지만 무선이므로 데이터 손실이 없을 수 없으며, 찾아보니 그 이유중 하나는 다음과 같다. (출처 – https://interrupt.memfault.com/blog/ble-throughput-primer)

Counterintuitively, even though the Link Layer of BLE is reliable, packet loss is still something to be concerned about for BLE. This is because many many stacks drop data within the software stack. For example, BLE messages get queued up in the stack and when the heap holding the packets runs out of memory, some stacks will silently drop data. This means if you are sending large amounts of data over BLE you will usually want to add some sort of reliability layer that can detect & retransmit messages when data is dropped. The way this is implemented can have sizeable impacts on throughput. For example, if you have designed your own protocol on top of L2CAP or GATT and every message sent requires an acknowledgement before another message is sent, you’ll typically wind up adding a connection interval worth of latency getting the data sent out, effectively halving the max throughput which can be achieved.

즉 BLE Link Layer는 reliable하지만 BLE stack에서 힙의 메모리가 부족할 때 일부 스택은 자동으로 데이터를 삭제된다. 따라서 상위레벨의 프로토콜에서 재전송 기법을 사용해야 함.

Mitigation of Data Packet Loss in Bluetooth Low Energy-Based Wearable Healthcare Ecosystem 이 문서의 내용 참고


nRF52 Segger Embedded Studio 설정 – CMSIS Configuration Wizard

노르딕에서 제공하는 예제코드의 경우 SDK 설정이 sdk_config.h에서 이루어 진다. 문제는 이 파일의 사이즈가 크고 #ifdef 등으로 설정이 되어 있어서 파일 자체를 보기가 불편하다. 그래서 이 설정을 쉽게 하는 툴이 제공이 되는데, 기본 SES 설정에는 없어서 따로 설정을 해야 한다.

  1. Go to File -> Open Studio Folder… -> External Tools Configuration.
  2. The tools.xml file will be opened in the editor.

다음의 코드를 삽입한다

<item name=“Tool.CMSIS_Config_Wizard” wait=“no”>
     <menu>&amp;CMSIS Configuration Wizard</menu>
     <text>CMSIS Configuration Wizard</text>
     <tip>Open a configuration file in CMSIS Configuration Wizard</tip>
     <key>Ctrl+Y</key>
     <match>*config*.h</match>
     <message>CMSIS Config</message>
     <commands>
         java -jar &quot;$(CMSIS_CONFIG_TOOL)&quot; &quot;$(InputPath)&quot;
     </commands>
</item>

참고 – https://infocenter.nordicsemi.com/index.jsp?topic=%2Fcom.nordic.infocenter.sdk5.v15.0.0%2Fsdk_config.html


Simplicity Studio 5 – 맥에서 이슈 해결

Silab 사의 개발 환경인 Simplicity Studio 5 를 맥(Big Sur)에서 사용시 프로젝트를 구성을 할 때 Bluetooth Configurator 가 제대로 안되고 에러가 난다.

An internal error occurred during: “Generating apack_btConfig for project_name“.

Failed to generate setup apack_btConfig exited with 134:

dyld: Library not loaded: /System/Library/Frameworks/CoreFoundation.framework/Versions/A/CoreFoundation

  Referenced from: /Applications/Simplicity Studio.app/Contents/Eclipse/developer/adapter_packs/python/bin/python3

  Reason: image not found

문제를 해결하기 위해서는 /Applications/Simplicity Studio.app/Contents/Eclipse/developer/adapter_packs/python/bin/ 이 위치에 설치된 파이썬을 사용하지 않고 Python 3.6버전을 사용하고 이 버전에 심볼릭 링크를 거는 것이다.

1.  Create a python 3.6 anaconda environment. Activate it and find the location of python in the env.

In my case, it is /Users/user_name/opt/anaconda3/envs/studio/bin/python

2. Soft link all python files to that location in the following location.
/Applications/Simplicity Studio.app/Contents/Eclipse/developer/adapter_packs/python/bin

ln -s /Users/yaoyu/opt/anaconda3/envs/studio/bin/python ./python

ln -s /Users/yaoyu/opt/anaconda3/envs/studio/bin/python ./python3

ln -s /Users/yaoyu/opt/anaconda3/envs/studio/bin/python ./python3.6

참고: https://www.silabs.com/community/software/simplicity-studio/forum.topic.topic.15.15.html/macos_big_sur_support-UO87 


SES(Segger Embedded Studio)에서 NRF_LOG_INFO 문제

SES환경에서 NRF_LOG_INFO(“Blinky example started!!!”)와 같은 같은 디버그 문구가 Debug Terminal에 보이지 않는 이슈 해결 방법

sdk_config.h 파일에서 다음과 같이 기존에 1로 설정되어 있던 값을 0 으로 수정한다.

#define NRF_LOG_DEFERRED 0
#define NRF_FPRINTF_FLAG_AUTOMATIC_CR_ON_LF_ENABLED 0

#define NRF_LOG_BACKEND_RTT_ENABLED 1
#define NRF_LOG_ENABLED 1
이 설정도 되어 있어야 함.

그런데 다음 설정은 0으로 되야 함
#define NRF_LOG_BACKEND_UART_ENABLED 0

그리고 보드가 바뀌면 아래 핀 설정도 같이 해야 함.
#define NRF_LOG_BACKEND_UART_TX_PIN 6


Bluetooth 보안 문제 – SweynTooth

블루투스 소프트웨어 스텍에서 발견된 문제들. 다수의 칩 벤더들의 SDK에 문제(deadlocks, crashes and buffer overflows or completely bypass security)가 있어서 패치가 제공되었다.

Table 1: Vulnerabilities type and affected vendors


Type
Vulnerability Name
Affected Vendors
CVE


Crash
Link Layer Length Overflow
Cypress
CVE-2019-16336 (6.1)
NXP
CVE-2019-17519 (6.1)


Truncated L2CAP Dialog Semiconductors CVE-2019-17517 (6.3)


Silent Length Overflow Dialog Semiconductors CVE-2019-17518 (6.4)


Public Key Crash Texas Instruments CVE-2019-17520 (6.6)


Invalid L2CAP Fragment Microchip CVE-2019-19195 (6.8)


Key Size Overflow Telink Semiconductor CVE-2019-19196 (6.9)


Deadlock
LLID Deadlock
Cypress
CVE-2019-17061 (6.2)
NXP
CVE-2019-17060 (6.2)


Sequential ATT Deadlock STMicroelectronics CVE-2019-19192 (6.7)


Invalid Connection Request Texas Instruments CVE-2019-19193 (6.5)


Security Bypass Zero LTK Installation Telink Semiconductor CVE-2019-19194 (6.10)


Table 2: Vulnerabilities and SDK versions of the affected SoCs.* indicates extra affected SoCs reported by the vendor not tracked by our team.


Vuln.
SoC Vendor
SoC Model
SDK Ver.
Qualification ID(s)


BLE Version 5.0/5.1
6.1,6.2 Cypress (PSoC 6) CYBLE-416045 2.10 99158
6.5,6.6 Texas Instruments CC2640R2 3.30.00.20 94079
6.9,6.10 Telink TLSR8258 3.4.0 92269, 136037
6.7 STMicroelectronics WB55 1.3.0 111668
6.7 STMicroelectroncis BlueNRG-2 3.1.0 87428, 106700, 94075
6.4 Dialog DA1469X* 10.0.6 100899
6.3 Dialog DA14585/6* 6.0.12.1020 91436


BLE Version 4.2
6.1,6.2 Cypress (PSoC 4) CYBL11573 3.60 62243, 136808, 79697, 82951, 79480
6.1,6.2 NXP KW41Z 2.2.1 84040
6.4 Dialog DA14680 1.0.14.X 87407, 84084, 71309, 75255


BLE Version 4.1
6.5 Texas Instruments CC2540 1.5.0 23454, 127418
6.3 Dialog DA14580 5.0.4 83573
6.8 Microchip ATSAMB11 6.2 73346


2.1 Attacks on IoT

Table 3: Products verified to be vulnerable


Product
Category
BLE SoC
Vulnerability
Impact


Eve Energy Smart Home
DA14680
(6.4) Silent Length Overflow
Crash
August Smart Lock Smart Home
DA14680
(6.4) Silent Length Overflow
Crash


Fitbit Inspire
Wearables
CY8C68237
(6.1) LL Length Overflow
Crash
(6.2) LLID Deadlock
Crash


CubiTag Gadget Tracking CC2640R2
(6.6) Public Key Crash
Deadlock


eGeeTouch TSA Lock Security CC2540
(6.5) Invalid Connection Request
Deadlock


문제가 있는 제품들

출처: https://asset-group.github.io/disclosures/sweyntooth/


ESP32 개발 환경 설정 – Mac OS

Mac OS에서 ESP32 개발 환경 설정은 다음의 링크를 참고한다.

Tool chain 설정

pip와 pyserial을 설치- 이 과정중에 dependency가 있는 라이브러리 설치는 sudo easy_install xxx  형태로 설치한다.

sudo easy_install pip
brew install cmake ninja dfu-util

다음은 툴체인을 다운로드하고, 설치를 하는 과정임

mkdir -p ~/esp
cd ~/esp
git clone --recursive https://github.com/espressif/esp-idf.git
cd ~/esp/esp-idf
./install.sh

환경설정

. $HOME/esp/esp-idf/export.sh

다음의 내용을  .bash_profile에 추가한 다음에 esp 개발시 터미널에서 get_idf를 실행하면 된다.

alias get_idf=’. $HOME/esp/esp-idf/export.sh’

추후에 리모트 깃의 내용을 업데이트 하려면 다음과 같이 한다.

cd ~/esp/esp-idf
git pull
git submodule update --init --recursive

프로젝트 확인

cd ~/esp
cp -r $IDF_PATH/examples/get-started/hello_world .

설정

cd ~/esp/hello_world
idf.py set-target esp32
idf.py menuconfig

빌드 및 다운로드

idf.py build
idf.py -p PORT flash monitor. // 빌드와 모니터링을 동시에

Monitor

make monitor

To exit the monitor use shortcut Ctrl+]


실내 측위 – BLE Tag, AoA, AoD

기존 비콘의 한계

  • Beacons only work with smartphones, not tags, which limits how they can be used
  • They are able to locate objects in best case within 3-4 meters, which is fine for determining a general location, but is not refined enough to meet the requirements for many of today’s applications
  • Beacons are battery-operated, which impacts their ability to deliver real-time location; frequent transmissions drain the device’s battery, meaning frequent replacements are necessary

AoA, AoD의 사용

AoA(신호의 수신 각도): 기기가 수신기 안테나 배열로 부터 오는 정확한 방향을 기반으로 한다. AoA를 사용하면 신호를 측정하기 위해 동일한 장치 내에서 여러 개의 안테나가 사용된다. 이렇게하면 안테나가 미터가 아닌 10-20 센티미터의 정확도로 태그 또는 스마트 폰을 찾을 수 있다.

AoD (신호의 출발 각도): 이 접근법에서 위치 정보는 모바일 장치로 다시 이동한다. AoD 접근법은 “실내 GPS”와 같이 작동하는데 고정 인프라 장치 (Locators라고도 함)는 GPS 위성 작동 방식과 마찬가지로 수신 장치를 브로드캐스트하고 인식하지 못한다. 즉, 무제한의 장치를 찾을 수 있고 개인 정보 문제는 없다.

참고


Jlink를 사용한 nRF51 flashing

지난번 nRF51개발 환경 포스팅에 빠진 부분인 flashing 부분

nrfjprog – Programming Tool

nrfjprog는 nRF5x-Command-Line-Tools의 번들 프로그램으로 SWD를 이용해 펌웨어 이미지를 로딩한다.

nrfjprog:

/* Optional: erase target if not already blank */
nrfjprog --family <nRF51/52> -e 
/* Load FW image to target */
nrfjprog --family <nRF51/52> --program _build/<name>.hex
/* Reset and run */    
nrfjprog --family <nRF51/52> -r

JlinkExe:

/* Open Jlink Commander from terminal in _build directory */ 
JLinkExe -device <nRF51/nRF52>
> erase // Optional: erase target if not already blank
> loadfile <name>.hex // loads FW
> r // Reset and halt
> g // Run
> q // Exit

JlinkExe -device nrf51822_xxaa -if swd -speed 4000


J-link 인터페이스

Segger사의 J-link 디버거는 JTAG과 SWD인터페이스를 제공한다.

JTAG  pin-out

SWD를 사용하기위해서는 위 20핀에서 필요한 4핀만 연결하면 된다. 여기서 VTref신호는 디버거에서 타겟보드의 전압을 체크하고 전압레퍼런스로 사용하기 때문에 타겟 보드의 전원을 연결하고, 프로그래밍을 할 MCU의 전압과 연결해야 한다. 그렇지 않을 경우 VTref is 0.xxxxV라고 에러메시지가 나면서 연결이 되지 않는다.

*참고로 J-link와 같은 디버거를 DIY형태로 개발을 해서 OSHW로 판매를 하는 것이 있다.  OSHChip_CMSIS_DAP_V1.0

참고: https://www.segger.com/interface-description.html


Pages:12