:::: MENU ::::
Browsing posts in: IoT

IoT 킬러 앱?

IoT 분야는 한가지 킬러앱이  존재하지 않는다. 즉 특정한 고객의 특정한 분야의 특정한 문제를 해결해야 하며, 버티컬 마켓이다. 따라서

사용자의 니즈를 확실히 이해해서 가치를 제공해야 하며

IoT를 이용하여 “실시간 데이터를 수집, 처리해서 better, faster, cheaper 한 방법”으로 문제를 해결해야 한다.

참고: https://www.iotcentral.io/blog/why-there-s-no-killer-app-for-iot


무선으로 3D Printer 사용하기

3D프린팅을 위해서 SD 메모리를 사용하거나,  USB 케이블을 연결해서 프린팅을 한다. 하지만 USB 케이블을 사용하면, 장시간 프린팅시 1대의 PC가 프린팅만을 위해 사용될 수 밖에 없다. 무선으로 프린팅시 다음과 같은 장점이 있다.

  • The noisy printer can be placed in a sperate location allowing for different ventilation options, and convenient noise reduction.
  • Less mess.  Cords can be ugly and can be trip hazards.
  • Multiple computers are becoming a household norm.  Sick of giving up your computer for your significant other, child, or visiting a friend to play with your 3D printer?  Go wireless.
  • 3D printing is a long process.  Wouldn’t it be nice to be able to start a print job from a remote location to be completed by the time you get home?

그리고 이 USB케이블을 사용하지 않고 무선으로 프린팅을 하기위해 OctoPrint, AstroPrint, Repetier Server등의 Host 프로그램이 필요하다.

OctoPrint

  • 오픈소스 기반. 업데이트는 빠르지 않은 편
  • 설정이 너무 많아서 잘 알지 못하면 오히려 불편

AstroPrint

  • OctoPrint를 기반으로 사용성을 개선한 제품
  • UI가 간단하여 일반사용자에게 알맞음

Repetier Server

  • UI가 괜찮음
  • 무료버전과 유료버전이 있음

이 세가지 제품을 각각 Linux, Mac, Windows에 비교. 😉

http://3dprinterpower.com/index.php/best-3d-printer-wireless-host-software/


삼성 Artik Edge-to-cloud Security

삼성 아틱의 보안은 Edge-to-cloud Security라고 설명을 한다. 즉 칩레벨에서 부터 클라우드까지 보안요소가 있다는 얘기.

Device Protection and Trusted Code Execution

Hardware의 경우 Device protection과 trusted code execution이 가장 중심이 되는 요소임.

  • Secure Boot
    타겟 디바이스에서 동작하는 코드의 신뢰성을 보장이 필요
    소프트웨어는 타겟장치에서 코드 실행을 허용하기 위해 소프트웨어 공급자가 서명해야함.
  • KMS infrastructure for code signing
    코드 서명을 쉽게하기위한 Key Management Service (KMS), ARTIK CodeSigner service, FIPS-certified hardware security modules (HSM)를 제공
  • Secure Element
    각 디바이스에 SmartThings cloud에 등록된 private/public key쌍이 저장이 되어서 출시됨.
  • Secure JTAG access
    JTAG을 사용시 패스워드 필요

Protected Communications

디바이스와 클라우드 사이의 통신 보안

  • Encryption
    Transport Layer Security (TLS) 또는 datagram transport layer security (DTLS)사용
    ARTIK modules also provide hardware acceleration (Crypto Engine) for AES and RSA encryption and decryption. Additionally, the ARTIK platform uses Elliptic Curve Diffie–Hellman (ECDH) for session encryption key generation, which provides a high level of protection with low power consumption.
  • Authentication
    Public Key Infrastructure (PKI) 사용
  • Easy secure onboarding
    Secure Device Registration (SDR): Mutual authentication between a gateway device and the cloud registration servers

Edge-to-cloud Security


이 한장의 그림으로 지금까지 설명된 내용이 나와있음.

참고


MQTT 란?

MQTT?

MQ Telemetry Transport 약자

It is a publish/subscribe, extremely simple and lightweight messaging protocol, designed for constrained devices and low-bandwidth, high-latency or unreliable networks.

MQTT 사용하는가?

IoT(Internet of Thing): Thing Internet에 연결을 하려면 Ethernet, WiFi, Cellular 등이 필요하다. 이런 connectivity가 대부분 무선으로 가고 있는데, 무선이라 함은 이동성이 보장되야 하므로 밧데리가 필요하고 파워소모는 중요한 요소이다. 파워를 적게 사용하기 위해서는 빨리 연결을 하고, 데이터를 보내고 빨리 연결을 끊어야 한다. 특히 데이터에 오버헤드가 없어야 한다. 셀룰라에서 데이터는 돈이니

HTTP?

HTTP stateless 이므로 데이터를 보내기 위해서는 매 데이터 전송 연결을 해야한다. 따라서 HTTP는 웹페이지 같은 대용량의 데이터를 보내기에는 적합하지만 가볍지 않고, 빠르지 않다또다른 문제는 HTTP pull only이다. 즉 디바이스는 서버에 데이터를 보낼수 있지만, 서버에서 데이터를 받야하 하는 경우는 지속적으로 서버에 물어봐야 한다. 이런 pull update는 시간이 많이 걸리고 데이터도 많이 소비된다.

MQTT

이에비해 MQTT 아주 간단하고 가볍다. 서버에 연결시 단지 80바이트만 필요하다. 계속 연결이 되며(MQTT Broker 연결을 유지하기 위해 Keep alive packet 주기적으로 보내야 ), 데이터 publication(디바이스가 데이터를 서버에 보내는 ) subscription(서버가 디바이스로 데이터를 보내는 ) 20바이트 정도이다. MQTT 메쉬네트웍이나 TCP/IP, Bluetooth위에서 동작가능하다.

Topic

Pub Sub는 토픽을 기준으로 작동한다. 토픽은 슬래시(/)를 이용해서 계층적으로 구성할 수 있어서 대량의 센서 기기들을 효율적으로 관리 할 수 있다

Port Number: 1883, 8883

TCP/IP port 1883 is reserved with IANA for use with MQTT. TCP/IP port 8883 is also registered, for using MQTT over SSL.

QoS

MQTT 3단계의 QoS(Quality of service) 제공한다.

  • 0 : 메시지는 한번만 전달하며, 전달여부를 확인하지 않는다. Fire and Forget 타입이다.
  • 1 : 메시지는 반드시 한번 이상 전달된다. 하지만 메시지의 핸드셰이킹 과정을 엄밀하게 추적하지 않기 때문에, 중복전송될 수도 있다.
  • 2 : 메시지는 한번만 전달된다. 메시지의 핸드셰이킹 과정을 추적한다. 높은 품질을 보장하지만 성능의 희생이 따른다.

참고


IoT 관련 단상

IoT의 핵심요소

  • Connectivity: 이건 당연하고, 여기에 security가 필요
  • Interoperation: 이건 가능하면 좋겠지만, IoT응용이 vertical market이라서 대기업이 아니고는 큰 의미가 없을 듯.
  • Intelligence: 이건 조만간 반드시 있어야 서비스에 차별화가 될 듯

Blynk 사용법

Blynk는 IoT응용을 쉽게만들어 주는 앱이다.  동작 방식은 아래 그림과 같이 앱이 서버를 거쳐서 디바이스에 접근을 하고, 디바이스역시 서버를 거쳐서 앱과 통신을 한다. 단 디바이스에는 Blynk에서 제공하는 라이브러리를 설치를 해야한다.

디바이스

현재 지원하는 디바이스는 아두이노, ESP8266, 라즈베리파이… 등 다양하며(지원하는 하드웨어), Bluetooth, WiFi등의 connectivity가 없는 경우에도 PC를 통해서 동작이 가능하다. 아두이노에서는 스케치 > 라이브러리 포함하기 > 라이브러리 관리…를 선택해서 Blynk로 검색을 하면 라이브러리 및 예제의 설치가 가능하다. 그리고 펌웨어에서는 앱을 통해 받은 토큰을 코드에 넣어서 서버와 통신을 한다.

다운로드 받은 앱에서는 사용자 등록을 하고 디바이스와 연결될 위젯을 선택하고 이 위젯에 연결할 물리적 핀을 할당한다. 즉 버튼을 추가하고, 이 버튼을 PIN13에 연결을 하면 앱에서 버튼을 누를때 마다 보드의 PIN13이 On/Off된다. 재미있는 것은 물리적인 핀뿐 아니라 Vitrual Pin을 지정해서 아무런 값이나 파라미터로 전달이 가능하다는 것.  BLYNK_WRITE 함수는 서버에서 virtual pin값을 쓰면 실행되는 함수, BLYNK_READ 함수는 디바이스에서  virtual pin에 값을 쓰면 서버에 반영이 되는 함수이다. 즉 read / write는 서버의 관점.

BLYNK_WRITE(vPIN)

BLYNK_WRITE defines a function that is called when device receives an update of Virtual Pin value from the server:

BLYNK_WRITE(V0)
{   
  int value = param.asInt(); // Get value as integer

  // The param can contain multiple values, in such case:
  int x = param[0].asInt();
  int y = param[1].asInt();
}

BLYNK_READ(vPIN)

BLYNK_READ defines a function that is called when device is requested to send it’s current value of Virtual Pin to the server. Normally, this function should contain some Blynk.virtualWrite calls.

BLYNK_READ(V0)
{
  Blynk.virtualWrite(V0, newValue);
}

예제

구체적인 것은 이 문서의 설명과 예제를 따라가면 쉽게 이해가 간다.

기타

Blynk Doc 참고


IoT 비즈니스 모델

  1. Subscription model: IoT as a Service, freemium. ex) monitoring as a service” and “predictive maintenance as a service”.
  2. Outcome-based model: 기기자체의 가격이 아닌, 기기를 사용해서 얻은 이익에 대해 가격을 매김
  3. Asset-sharing model: ex) Smart battery. 초과 발전한 것을 grid에 되 팔 수 있는
  4. IoT Products as a Proxy to Sell Another Product: 아마존 dash button 같은
  5. IoT Products as a Vehicle to Monetize Data

참고: How to Monetize Your IoT Product


Mac OS에서 ESP8266 개발 환경

아두이노

1. Arduino > Preferences… 의 메뉴에서 추가적인 보드매니저 URLs에 다음의 링크를 입력한다.

http://arduino.esp8266.com/stable/package_esp8266com_index.json

2. 툴 > 보드 > 보드 매니저… 의 메뉴의 필터에 ESP를 입력 후 esp8266을 선택후 설치한다.

Sming

맥에서는 https://github.com/SmingHub/Sming/wiki/MacOS-Quickstart 이 링크의 내용대로 따라하면 별 무리가 없다. 즉 이클립스, 툴체인, ESP SDK를 설치하고 Sming core를 빌드한다.

이클립스의 환경설정에서 SMING_HOME, ESP_HOME 설정을 한다.


SmingFramework의 Makefile-project.mk파일에서 ESPTOOL2의 경로를 다음과 같이 수정한다.

ESPTOOL2 ?= /opt/esp-open-sdk/utils/esptool2

Makefile-macos.mk파일에서 ESPTOOL의 경로를 다음과 같이 수정하고, COM_PORT항목도 환경에 맞게 수정한다.

ESPTOOL ?= $(ESP_HOME)/utils/esptool.py

Basic_Blink 프로젝트의 Makefile-user.mk파일도 다음과 같이 수정한다.

# Local build configuration

## Parameters configured here will override default and ENV values.

## Uncomment and change examples:

## Add your source directories here separated by space

MODULES = app

EXTRA_INCDIR = include

## ESP_HOME sets the path where ESP tools and SDK are located.

## Windows:

# ESP_HOME = c:/Espressif

## MacOS / Linux:

ESP_HOME = /opt/esp-open-sdk

## SMING_HOME sets the path where Sming framework is located.

## Windows:

# SMING_HOME = c:/tools/sming/Sming

## MacOS / Linux

SMING_HOME = /opt/sming/Sming

## COM port parameter is reqruied to flash firmware correctly.

## Windows:

# COM_PORT = COM3

## MacOS / Linux:

COM_PORT = /dev/tty.usbserial-A50285BI

## Com port speed

COM_SPEED= 115200

## Configure flash parameters (for ESP12-E and other new boards):

SPI_MODE = dio

## SPIFFS options

#DISABLE_SPIFFS = 1

SPIFF_FILES = files

Sming 프레임워크 소스코드를 불러와서 라이브러리를 빌드

  • Eclipse 실행
  • [File -> Import -> General -> Existing Project into Workspace] 선택
  • [Select root directory] 에서 SmingFramework 프로젝트 폴더를 선택
  • 프로젝트에서 Build

Blink 예제 빌드 확인

  • [File -> Import -> General -> Existing Project into Workspace] 선택
  • [Select root directory] Basic_Blink 프로젝트 폴더선택
  • 프로젝트에서 Build

프로젝트 빌드가 성공하면 [프로젝트 폴더\out\firmware] 폴더안에 *.bin 파일들이 생긴다.

참고


CREATOR Pro 보드 사용 및 분석

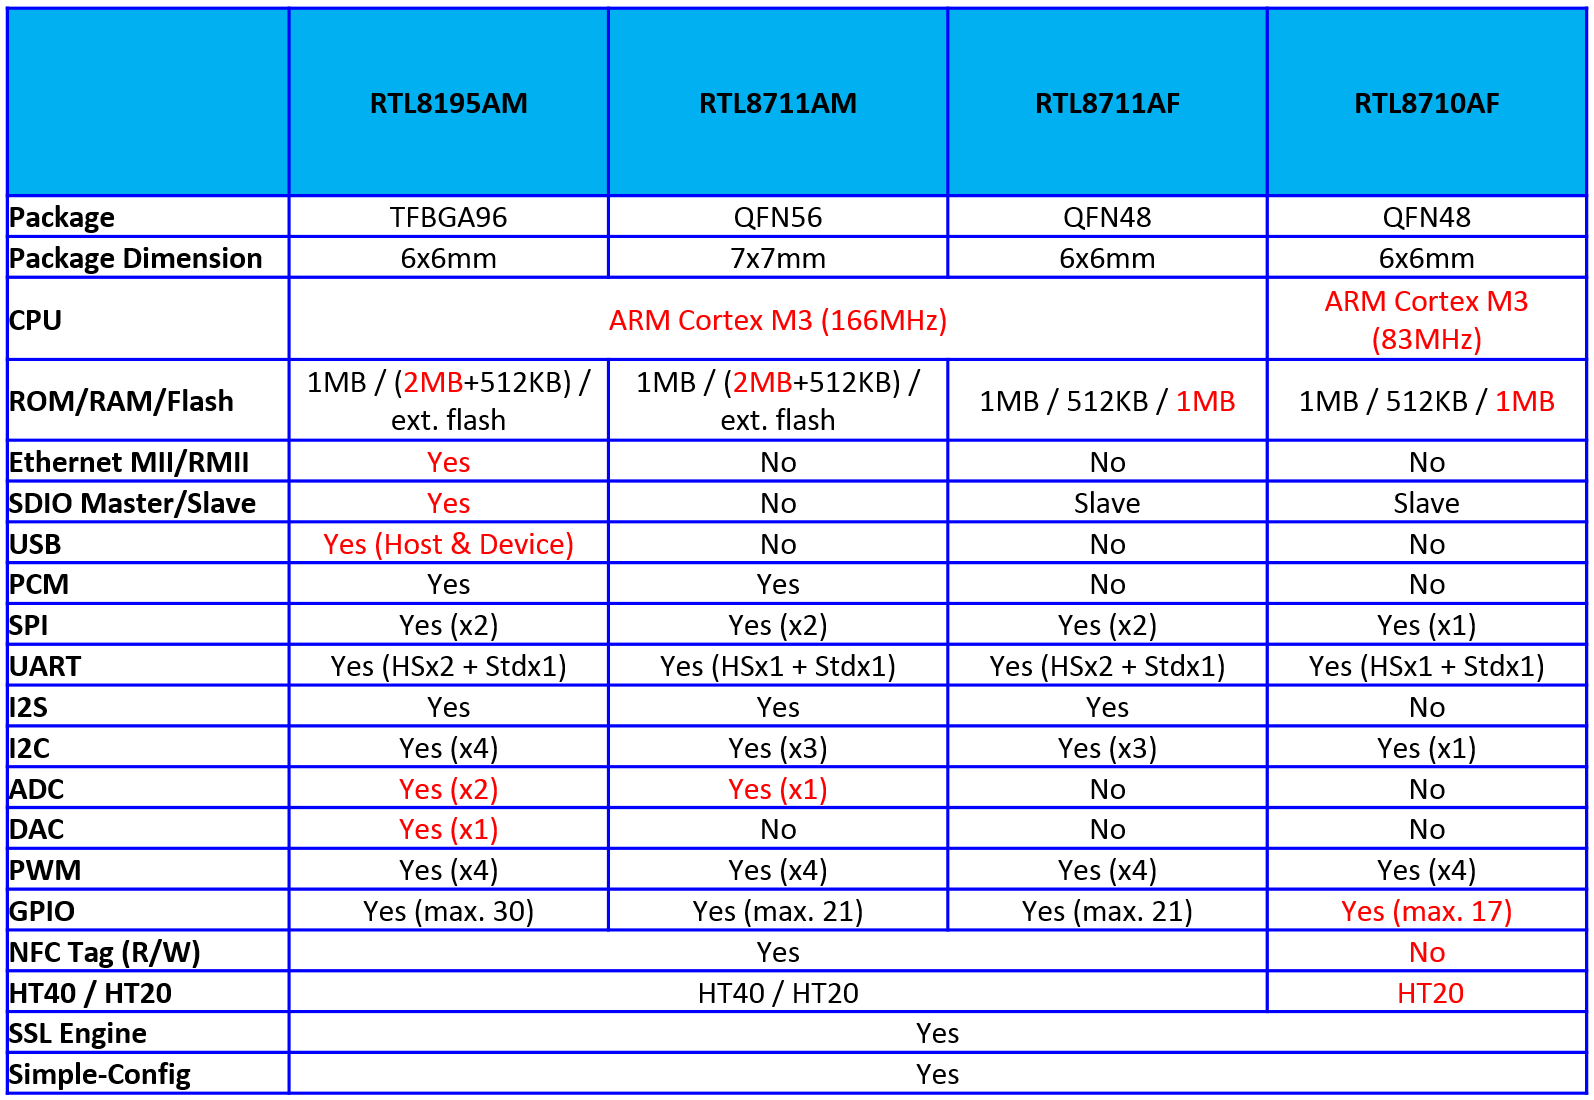
Rak Wireless사의 CREATOR Pro 보드는 Arduino Uno의 폼펙터를 가지며, RAK473 WiFi 모듈을 사용하고 NXP사의 LPC11U35를 사용해서 mbed에서도 프로그래밍이 가능하고, Arduino에서도 프로그래밍이 가능하다. WiKi에 나온 이 제품의 정보는 다음과 같은데, Realtek사의 Ameba RTL8710보드와 거의 동일하다.

CREATOR is a programmable platform for developing all kind of IoT applications. CREATOR is equiped with various peripheral interfaces, including Wifi, GPIO, I2C, UART, PWM, ADC. Through these interfaces, CREATOR can connect with electronic components such as LED, switches, manometer, hygrometer, PM2.5 dust sensors etc.
The collected data can be uploaded via WiFi, and be utilized by applications on smart devices to realize IoT implementation.
CREATOR and Arduino Uno have similar size, and the pins on CREATOR are compatible with Arduino Uno. CREATOR uses Micro USB to supply power, which is common in many smart devices.
Currently, CREATOR currently supports Windows XP/7/8 32 and 64 bits and MAC OS operating systems. In this example, please use Arduino IDE with version 1.6.7 or later.

LPC11U35의 역할

  • CMSYS-DAP가 내장
  • RAK473를 프로그래밍 및 디버깅이 가능하게 함
  • CMSYS-DAP 펌웨어는 JTAG을 통해서 업로드하고, 이후에는 CRP-DISABLED에 파일을 Copy하면 된다. 문제는 Mac에서 파일을 카피하면 안되고 윈도우즈에서만 된다. 관련자료
  • Tindie에서 $15에 판매하는 같은 기능을 갖는 외장형 보드

RAK473

Rak 홈페이지의 자료 및 Github의 자료

아두이노 개발 환경에서 사용법

추가적으로 함께 보면 좋은 자료