애플 앱 스토어가 아닌 다른 경로로 프로그램을 다운로드해서 인스톨시 문제가 생기는 경우, 대부분의 경우 원인은 Gatekeeper가 enable되어서 생기는 문제.
현재 상태확인
spctl –status
비활성화 & 활성화
sudo spctl –master-disable
sudo spctl –master-enable
 0 comments
 애플 앱 스토어가 아닌 다른 경로로 프로그램을 다운로드해서 인스톨시 문제가 생기는 경우, 대부분의 경우 원인은 Gatekeeper가 enable되어서 생기는 문제.
현재 상태확인
spctl –status
비활성화 & 활성화
sudo spctl –master-disable
sudo spctl –master-enable
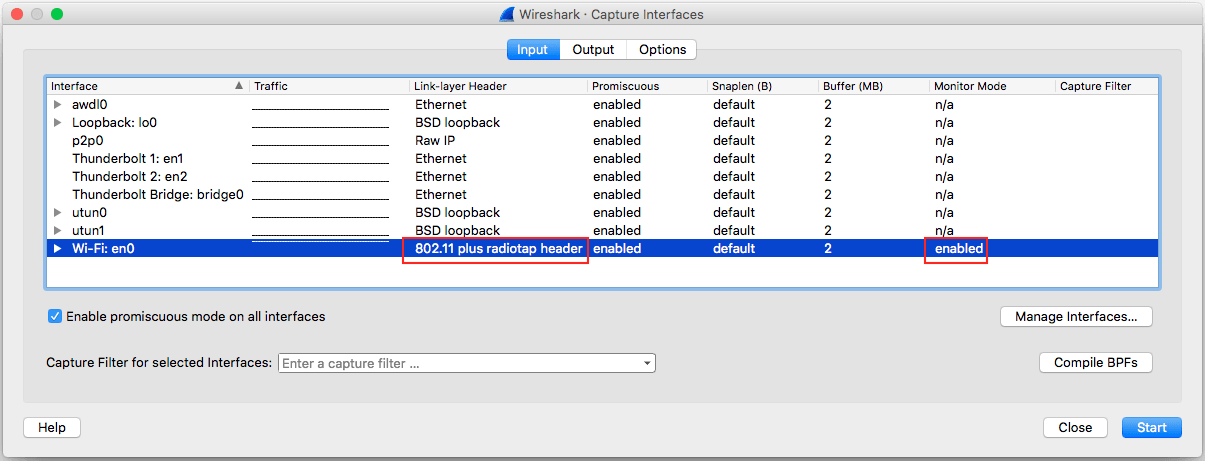
0 comments Wireshark wiki에 monitor mode에 대한 설명이 나온다. 그런데 airport를 사용하는 내용이라서 별 의미가 없다. Wireshark에서 무선랜 데이터를 캡쳐하려면 monitor mode를 enable해야 하는데, 이 옵션은 윈도우즈를 오른쪽으로 많이 드래그를 해야 옵션을 찾을 수 있다. 그리고 link-layer를 802.11로 변경은 그냥 프로그램을 재실행하면 된다.
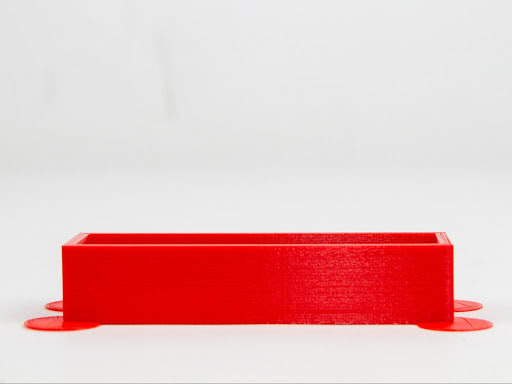
0 comments 3D 프린팅을 하면서 일반적으로 모델의 사이즈가 큰 경우 모델의 바닥부터 필라멘트가 수축을 하면서 들뜨게 된다.

이런 현상을 방지하기 위해서는
그리고 이 글(HOW TO STOP FILAMENT WARPING IN 3D PRINTED PARTS)에서는 Brim을 넣을 때 lily pads를 넣는 것을 설명하고 있는데 좋은 아이디어 인듯.
ABS의 경우 참고자료
0 comments Meshlab은 3D프린팅에 필요한 파일의 메쉬를 수정할 수 있는 툴로 오픈소스이며, 3가지 OS를 지원한다. 그리고 웹에서 구현한 버전도 있다.

이 소스를 빌드하려면 다음과 같은 3가지 소스가 필요하다.
* 필요한 소스들 3가지
* VS(Visual Studio)로 컴파일하기
1. QT 컴파일
(1) QT소스의 압축을 풀고, VS(Visual Studio) Command prompt를 실행하여 해서 다음과 같이 설정을 한다.
(2) 만약 VS가 여러 버전이 설치되어 있다면,
set QMAKESPEC=win32-msvc2008
를 입력하여 컴파일러 버전을 설정해야 함. 만약 VS가 2008만 설치되어 있다면 이 과정은 생략해도 됨
(3) 다음과 같은 절차로 QT를 컴파일
configure -debug-and-release
qmake 컴파일 및 실행. <= VS에 대한 makefile을 생성하는 과정
nmake
를 입력하여 QT 전체를 다시 컴파일
2. MeshLab 컴파일
(1) VS prompt 상에서 다음과 같이 입력하여 환경변수를 잡아 줌
set QTDIR=C:\Qt\4.6.3
set PATH=C:\Qt\4.6.3\bin
set VCPATH=C:\Program Files\Microsoft Visual Studio 9.0\VC\bin
set PATH=%PATH%;%VCPATH%;%SystemRoot%\System32
set QMAKESPEC=win32-msvc2008
(2) VCG라이브러리의 경로 설정
VCG Library의 경로를 meshlab 소스와 같은 레벨에 둔다.
(3) meshLab의 external 부분 컴파일
meshLab의 src\external 로 이동하여 다음과 같이 입력하여 솔루션 파일을 만든다.
qmake -tp vc -recursive external.pro
external.sln 파일이 생성된다. 이 파일을 VS로 열어서 솔루션을 다시 빌드한다.
(4) meshLab 소스 컴파일
meshlab의 src 로 이동하여 다음과 같이 입력하여 솔루션 파일 생성
qmake -tp vc -recursive meshlabv12.pro
meshlabv12.sln 파일이 생성됨.
이것을 VS로 열어서 빌드한다. (솔루션 속성에서 시작 프로젝트를 meshlab프로젝트로 설정한다.)
* io_3ds가 link 에러가 발생하면 제거.
(5) meshLab의 src\distrib로 이동하면 빌드된 파일 meshlab.exe을 확인한다.
이 파일을 실행시 에러가 나면 QT\Bin 에서 dll 파일을 동일 폴더에 복사해서 실행한다.
* 트러블 슈팅
아래와 같은 에러가 나면 바이러스 체크프로그램을 끄고 다시 작업.
general error c101008d: Failed to write the updated manifest to the resource of file… Access is denied.
참고: http://blog.csdn.net/zyjiang0571/article/details/7340650
0 comments 0 comments 3D 프린팅을 위한 슬라이서 프로그램인 Slic3r는 오픈소스로 github에 코드가 공개되어 있다. 물론 각 OS에 맞는 실행파일을 다운로드해서 사용이 가능하지만 github에 공개된 코드를 빌드해서 사용이 가능하다. Windows, Mac, Linux 등 3가지 OS에서 빌드가 가능하며, Mac OS X에서 빌드하는 방법은 https://github.com/alexrj/Slic3r/wiki/Running-Slic3r-from-git-on-OS-X에 정리되어 있다.
Slic3r는 C++ 과 Perl로 작성이 되어 있다.
The core geometric algorithms and data structures are written in C++, and Perl is used for high-level flow abstraction, GUI and testing.
그리고 다음과 같은 기능이 있다.
Key features are:
Other major features are:
이중 auto-repair기능에 대한 설명은 메뉴얼에 나와있는데, 홀이 있거나 앞뒤가 뒤바뀐 경우 자동으로 repair한다. 이 기능을 off하는 방법은 없다. 이외 추가적으로 Netfabb이나 FreeCAD도 추천을 하고 있다.
If the 3D mesh described in the model contains holes, or edges are misaligned (known as being non-manifold), then Slic3r may have problems working on it.
0 comments 원격 3D프린팅을 지원하는 기기인 AstroPrint 분석
1. 가격
2. 카메라
참고 자료: https://blog.astroprint.com/live-video-streaming-is-now-available-on-astroprint/
0 comments 오픈소스하드웨어협회에서 2015년 부터 작업한 오픈소스하드웨어 인증 프로그램을 개시했다. 이 인증은 오픈소스하드웨어 정의를 따른 다면 받을 수 있는 인증이고, 인증을 받은 이후에 여기서 벗어난다면 패널티가 있다.

관련 자료 – http://www.oshwa.org/2016/10/07/announcing-the-oshwa-open-source-hardware-certification-program/
0 comments Mac에서 4버튼 마우스 사용하려면 키보드나 마우스의 키값을 수정할 수 있는 앱을 사용하여 설정하면 된다.
Karabiner https://pqrs.org/osx/karabiner/ 사용
아래 그림과 같이 마우스 버튼 4,5를 설정하면 Back, Forward기능이 된다.

0 comments BBC microbit를 오프라인에서 사용하려면 링크를 참고 하고 Manuall Installation 항목을 따라서 환경을 셋업한다.
1. yotta설치
Mac OS의 경우
brew tap ARMmbed/homebrew-formulae
brew install python cmake ninja arm-none-eabi-gcc
pip install yotta
Trouble shooting
brew 관련 아래과 같은 문제가 있을 경우
sudo chown -R $(whoami):admin /usr/local
cd $(brew –prefix) && git fetch origin && git reset –hard origin/master
터미널에서 다음과 같은 에러메시지가 나올때
error: connection error: (“bad handshake: Error([(‘SSL routines’, ‘ssl3_get_server_certificate’, ‘certificate verify failed’)],)”,)
pip install -U certifi
참고: https://github.com/ARMmbed/yotta/issues/744
2. Srecord 설치
brew install srecord
3. 예제 코드 받기
git clone https://github.com/lancaster-university/microbit-samples
cd microbit-samples
4. 타겟을 miccrobit로 설정
yt target bbc-microbit-classic-gcc
5. 프로젝트 빌드
yt build
6. 마이크로비트에 다운로드 하기
마이크로비트는 MICROBIT라는 이름의 외장디바이스로 되어 있으니 hex파일을 copy하면 된다.
cp ./build/bbc-microbit-classic-gcc/source/microbit-samples-combined.hex /Volumes/”MICROBIT”
참고
https://lancaster-university.github.io/microbit-docs/offline-toolchains/
http://yottadocs.mbed.com/#installing