
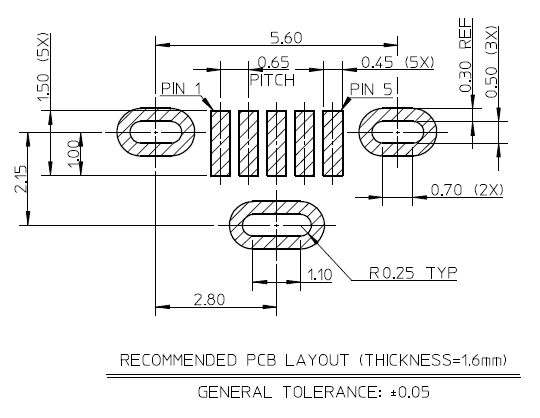
HC-05
- Default baud: 38400
- 6Pin (EN pin)
- 시리얼 터미널은 Both NL-CR 세팅
- AT command
HC-06
- Default baud: 9600
- 4Pin
- Line ending 없음
- AT command
 0 comments
HC-05
HC-06
0 comments Intel hex파일 포맷은 다음과 같은 형태이다.
:llaaaatt[dd...]cc
:020000040000FA
예를 들어 위와 같은 경우
End of File의 레코드는 다음과 같다.
:00000001FF
참고
0 comments Segger사의 J-link 디버거는 JTAG과 SWD인터페이스를 제공한다.
JTAG pin-out

SWD를 사용하기위해서는 위 20핀에서 필요한 4핀만 연결하면 된다. 여기서 VTref신호는 디버거에서 타겟보드의 전압을 체크하고 전압레퍼런스로 사용하기 때문에 타겟 보드의 전원을 연결하고, 프로그래밍을 할 MCU의 전압과 연결해야 한다. 그렇지 않을 경우 VTref is 0.xxxxV라고 에러메시지가 나면서 연결이 되지 않는다.
*참고로 J-link와 같은 디버거를 DIY형태로 개발을 해서 OSHW로 판매를 하는 것이 있다. OSHChip_CMSIS_DAP_V1.0


0 comments 

setWatch(function() { console.log(“Pressed”);}, BTN, {edge:”rising”, debounce:50, repeat:true});
via nRF Toolbox App (Android & iOS)
0 comments IoT 디바이스에 접급을 위해서 앱이 필요한 경우가 있는데, 이럴 경우 디바이스마다 앱이 존재하게 된다. 구글에서는 이걸 웹에서 해결하겠다는 접근이 피지컬 웹(Physical Web)이다. 이렇게 할 때의 장점은 디바이스에는 적은 기능만 넣고, 나머지는 웹쪽에서 구현을 하겠다는 의미이다. 이때 IoT 디바이스(비콘)가 자신의 URL을 주기적으로 Broadcasting하기만 하면 된다.
관련 정보
https://github.com/google/physical-web
0 comments ROHM 반도체 사이트에 나와 있는 전자부품에 대한 기본 지식 정보. 전자공학을 전공하면 배우는 내용이지만 다시 한번 리뷰를 할 수 있어서 좋다.
그리고 첨단기술에서 발행하는 주로 일본잡지를 번역한 전자기술의 내용도 실용적인 내용이 있어서 괜찮다. 가령 이런자료 – 반드시 주의해야할 모터/릴레이 파워 설계
0 comments Routing 과 Milling의 차이
“Routing” describes the cutting of the board profile, outline or contour. We use a 2 mm cutter for this. Any feature which can be cut with the 2 mm cutter is part of the profile.
“Milling” refers to any slots or cut-outs inside the PCB, but also to any slots in the profile of the PCB which can’t be cut with a 2 mm cutter.
즉 라우팅은 2mm 커터로 보드의 외곽을 자르는 것이고, 밀링은 보드 안쪽에 있는 cut-out 또는 슬롯을 더 작은 툴로 작업을 하는 것이다.
보드에 슬롯을 만드는 법
일반적이지 않기 때문에 PCB 업체에서 작업을 빠트릴 수 있다. 따라서 따로 알려주고, 0.50 mm 라인으로 작업을 하는데 Eagle CAD에서는 Eagle CAD에서는 Milling Layer 46에 작업을 한다.
하지만 PCB 업체에 따라서 이 작업이 안될 수 도 있다.
참고
http://docs.oshpark.com/submitting-orders/cutouts-and-slots/
http://www.eurocircuits.com/blog/158-Slots-and-cut-outs
이글캐드에서 장홀(plated slot) 만들기
드릴을 중첩적으로 배치하면 돼지만 DRC에서 에러가 난다. 관련 자료
방법은 위의 슬롯만들기와 동일하게 Milling 레이어에서 작업을 하고, 업체에 얘기를 해야 한다. ㅠㅠ
참고
http://electronics.stackexchange.com/questions/198590/how-to-add-holes-in-package-and-create-elongated-plated-holes-eagle
http://electronics.stackexchange.com/questions/202551/eagle-oval-pad
https://www.autodesk.com/products/eagle/blog/what-you-didnt-know-about-eagle-slotted-holes/
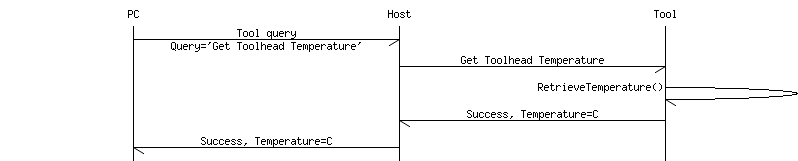
0 comments S3G protocol
구성 및 통신
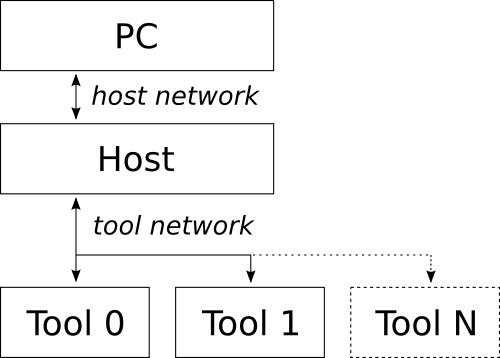
2가지 네트워크로 구성이 된다.
에러 방지를 위해 매 패킷의 마지막에 CRC를 사용
2 comments 1. gcc 설치
여기에서 다운로드 한다.
$ mkdir /usr/local/gcc-arm
$ tar -xjf gcc-arm-none-eabi-5_4-2016q3-20160926-mac.tar.bz2 -C /usr/local/gcc-arm
2. nRF5x-Command-Line-Tools-OSX
여기에서 다운로드 한다.
/usr/local/ 에 nrfjprog와 mergehex를 copy한다.
3. .bash_profile 수정
export PATH=/usr/local/bin:/usr/local/sbin:/usr/local/nrfjprog:$PATH
4. Segger Software and documentation pack for Mac OS X 설치
여기에 패키지 파일이 있다.
5. SDK설치 및 Makefile.posix 파일 수정
여기 또는 여기에서 SDK를 다운로드 해서 원하는 곳에서 압축을 푼다.
components/toolchain/gcc/Makefile.posix 이 파일을 gcc 버전에 맞게 수정한다.
GNU_INSTALL_ROOT := /usr/local/gcc-arm/gcc-arm-none-eabi-5_4-2016q3
GNU_VERSION := 5.4.1
GNU_PREFIX := arm-none-eabi
6. 컴파일 및 확인
example 폴더 아래에서 make해서 hex 파일이 생성되는지 확인한다.
$ make
7. 보드와 연결해서 다운로드가 되는지 확인한다.
$ make flash
Nordic에서 출시한 보드
PCA10028
PCA10031
참고
https://devzone.nordicsemi.com/blogs/22/getting-started-with-nrf51-development-on-mac-os-x/
https://aaroneiche.com/2016/06/01/programming-an-nrf52-on-a-mac/
http://www.nordicsemi.com/eng/Products/Bluetooth-low-energy/nRF51822
Getting started with the nRF5 development kit
https://devzone.nordicsemi.com/tutorials/
6 comments | Software | User | Price | OS |
|---|---|---|---|
| 3DPrinterOS | Beginners, Advanced Users | Freemium | Browser, Windows, Mac |
| Astroprint | Beginners, Advanced Users | Freemium | Browser, Raspberry Pi, pcDuino |
| Craftware | Beginners, Advanced Users | Free | Windows, Mac |
| Cura | Beginners, Advanced Users | Free | Windows, Mac, Linux |
| IceSL | Advanced Users | Free | Windows, Linux |
| KISSlicer | Beginners, Advanced Users | Free/$35 | Windows, Mac, Linux, Raspberry Pie |
| MakerBot Print | Beginners | Free | Windows, Mac |
| MatterControl | Beginners, Advanced Users | Free | Windows, Mac, Linux |
| Netfabb Basic | Intermediate Users, Advanced Users | Free | Windows, Mac, Linux |
| OctoPrint | Intermediate Users, Advanced Users | Free | Raspberry Pi, Windows, Mac Linux |
| Repetier | Intermediate Users, Advanced Users | Free | Windows, Mac Linux |
| Simplify3D | Beginers, Advanced Users | $150 | Windows, Mac |
| Slic3r | Advanced Users, Professional Users | Free | Windows, Mac Linux |
| SliceCrafter | Advanced Users | Free | Browser |
| Tinkerine Suite | Beginners | Free | Windows, Mac |
| Z-Suite | Beginners | Free | Windows, Mac |