:::: MENU ::::
Posts tagged with: IOT

arm White paper – The route to a trillion devices

소프트뱅크가 arm을 인수후  2017년에 발간된 arm의 백서 – The route to a trillion devices

2035년에는 1조개의 IoT 디바이스가 사용될 것이라는 전망

By 2035, the technology companies that sell IoT hardware and services could be serving a market worth a trillion dollars per annum. That is an exciting figure, but an even greater value will flow to the companies that utilize the information collected by those systems, and to the consumers who will benefit from widespread efficiency gains across the economy.


Thinger.io 서비스 사용하기

IoT 서비스 중 하나인 Thinger.io를 사용해 봤다.

아두이노 라이브러리를 제공을 해서 쉽게 ESP32에서 사용이 가능하다.

  • 먼저 아두이노 라이브러리 매니저에서 thinger로 검색을 해서 라이브러리를 설치를 하고 ESP32 예제를 연다.
  • 물론 먼저 이 서비스에 가입을 하고, USERNAME, DEVICE_ID, DEVICE_CREDENTIAL을 define 문에 정의한다.

#define USERNAME “*********”

#define DEVICE_ID “*********”

#define DEVICE_CREDENTIAL “*********”

  • 접속하고자 하는 SSID와 SSID_PASSWORD를 입력한다.

#define SSID “*********”  //your wifi SSID

#define SSID_PASSWORD “*********” // your wifi password

  • 아래 코드처럼 seup() 함수에 입출력을 정의하면, 서비스에서 이 값을 읽어서 대쉬보드에서 읽어서 데이터를 시각화 해준다.

// digital pin control example (i.e. turning on/off a light, a relay, configuring a parameter, etc)

thing[“BuiltInLed”] << digitalPin(2);

// resource output example (i.e. reading a sensor value)

thing[“dht11”] >> [](pson& out){

      out[“temperature”] = dht.readTemperature();

      out[“humidity”] = dht.readHumidity(); 

}


M5Stack with AskSensors

M5Stack은 ESP32기반의 디바이스이며, AskSensors는 IoT 디바이스로 부터 데이터를 받아서 그래프 형태로 보여주는 IoT 플랫폼이다.

M5Stack

ESP32 기반의 개발툴로 가로 세로  5cm라서 M5Stack이라고 이름이 붙여졌다고 한다.

AskSensors

AskSensors is an IoT platform designed to be the easiest application on the market, allowing users to connect, visualize and analyze their sensors data over the cloud. In this tutorial, we’ll be learning the basics you need to get started with askSensors, starting from creating account to visualizing data in graphs.

M5Stack으로 AskSensors에 데이터 보내기

M5Stack에 DHT12센서를 연결하여 온도, 습도 정보를, AskSensors에 연결해서 데이터를 그래프로 보는 형태의 구성은 다음과 같은 형태로 진행을 한다.

AskSensors 설정

설정은 간단하다. 서비스에 가입을 하고 새로운 센서(New Sensor를 클릭)를 만든후 모듈을 생성(모듈 탭에서 Add 버튼 클릭)한다. 여기서 모듈은 하나의 센서의 값을 받는 단위라고 생각하면 된다. 그러면 API 키가 생성이 되면 이 API 키의 end point에 데이터를 쓰면 된다.

AskSensors

모듈1에 10이라는 값을 쓴다면 다음과 같이 데이터를 보내면 된다.

https://asksensors.com/api.asksensors/write/MTWN7AQOLWJNEIF8RGMAW5EGKQFAHN2K?module1=10

Data Visualization

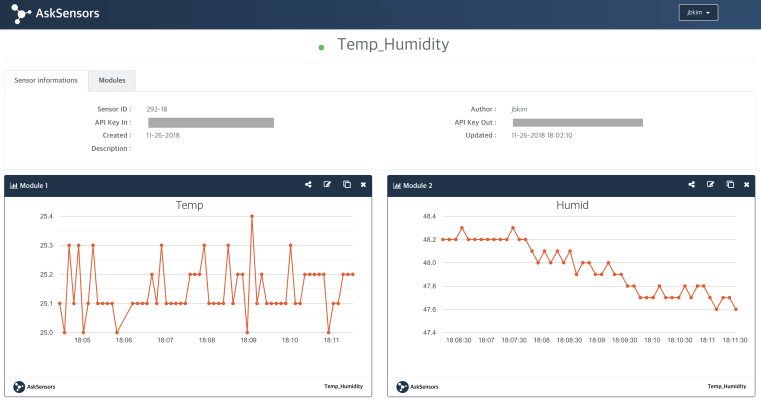
“Show graph”를 클릭하면 데이터를 그래프로 볼 수 있다.

AskSensors graph

실제 데이터

temp & humidity

테스트를 해보니 AskSensors는 ThingSpeak와 거의 같은 서비스인데 아직 베타버전. 아래 그림은 같은 데이터를 ThingSpeak에서 본 그래프이다.

ThingSpeak

참고


IFTTT의 Webhook 사용하기

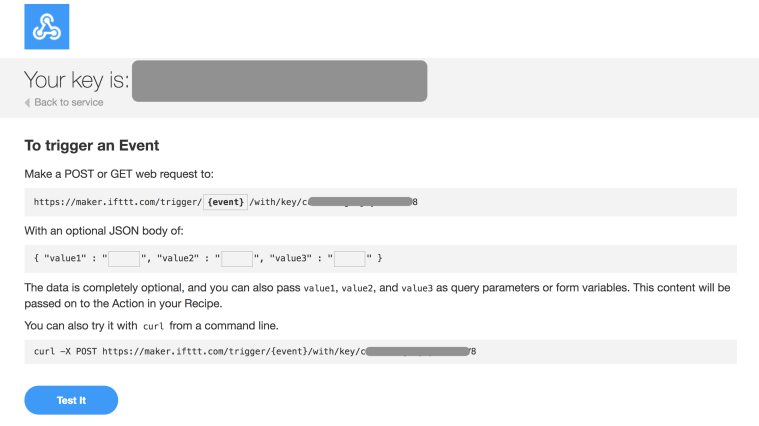
IFTTT에서 Webhook 서비스를 만들고 이 서비스의 endpoint 를 찾을 수가 없었는데, 이것은 https://ifttt.com/services/maker_webhooks/settings 에서 찾을 수 있다.

이 페이지에서 나온 URL을 브라우저에 입력을 하면 키값과 POST GET을 할 수 있는 URL 정보를 얻을 수 있다. 여기서 {event}의 값은 생성한 서비스의 event 이름이다.

https://maker.ifttt.com/trigger/{event}}/with/key/{key 값}

IF + Webhook + Notification 으로 만들면 IFTTT앱에서 알림을 받을 수 있다.

참고

https://help.ifttt.com/hc/en-us/articles/115010230347-The-Webhooks-Service

Connect Arduino to IFTTT for IoT Projects


WioLink 사용하기

WioLink

2016년에 킥스타터를 통해서 구매한 WioLink. 당시에 동작을 확인하고 사용을 하지 않고 있다가, 최근에 다시 사용을 하려고 보니 잘 동작을 하지 않는다. WiFi 설정은 되고, 서버에도 접속이 되는데 앱에서 디바이스를 구성을 하고 View API 버튼을 누르면 앱이 멈춰버린다.

펌웨어 업데이트

그래서 일단 펌웨어를 다시 업데이트를 해본다.
펌웨어 다운로드
Firmware: user1.bin user2.bin
Bootloader binary and other binaries: Esp8266sdk1.4.1.zip
Esp8266sdk1.4.1.zip을 압축을 풀고, boot***.bin 파일은 bootloader.bin으로 이름을 바꾼다.

esptool 설치

$ pip install esptool

다음과 같이 명령어 입력

esptool.py -p /dev/tty.SLAB_USBtoUART -b 230400 write_flash –flash_size 4MB-c1 0x0000 bootloader.bin 0x1000 user1.bin 0x101000 user2.bin 0x3fc000 esp_init_data_default.bin 0x3fe000 blank.bin

그래도 마찬가지이다. ㅠㅠ

wio cli를 설치해서 확인

https://github.com/Seeed-Studio/wio-cli 이 페이지의 내용을 보고 wio cli를 설치후 터미널에서 확인해 보니 디바이스를 제어가 가능하다.

$ wio list

이 명령어를 통해 사용이 가능한 명령어 리스트를 볼 수 있다.


wio cli의 명령어의 형태는 다음과 같고 버튼의 상태는 다음과 같이 얻을 수 있다.

$ wio call <token> <method> <endpoint>

$ wio call {tocken} GET /v1/node/GroveButtonD0/pressed

하지만 터미널에서 토큰을 복붙하고 명령어를 치기는 번거롭다.

아두이노에서 사용하기

연결되는 디바이스를 GPIO 15를 통해 MOSFET으로 제어를 한다. 따라서 다음의 코드를 스케치에 넣어야 한다. 

pinMode(15, OUTPUT);
digitalWrite(15, 1);

참고

https://github.com/Seeed-Studio/Wio_Link/wiki/Advanced-User-Guide
https://github.com/Seeed-Studio/wio-cli


Azure IoThub에서 수신된 데이터 확인하기

Azure IoThub에 디바이스를 연결하고 MQTT 프로토콜을 이용해서 데이터를 보내면 이 내용을 Monitoring > Metric 에서 설정하는 대로 그래프로 표시된다. 하지만 메시지 포멧과 데이터의 값을 보려면 콘솔을 열고 다음과 같은 명령을 입력해야 한다.

az iot hub monitor-events –hub-name {IotHub Name} –output table

여기서 IotHub Name는 생성한 IoTHub의 이름이다.

위 내용은 작년(2018)에 테스트를 하던 건데 오늘(2019.5.2) 다시 테스트를 하려고 보니 안된다. 구글링 해보니 CLI 명령어가 바뀜. 이 링크 를 확인.

az iot hub monitor-events -n {iothub_name}


Resin.io 사용법

Resin.io의 홈페이지에는 다음과 같이 자신들의 서비스를 설명을 한다.

Resin.io brings the benefits of Linux containers to the IoT. Develop iteratively, deploy safely, and manage at scale.

Linux containers to the IoT… 리눅스 기반의 IoT 디바이스를 위한 도커같은 서비스 일 것 같다.

Resin.io 사용법

Account setup

resin.io 에 계정을 생성후 SSH 키 설정하여 resin에 저장을 하는데,  깃헙계정으로 로그인 할 경우 깃헙계정에 저장된 SSH 키 중 하나를 선택한다.

SSH 키 확인

ls -al ~/.ssh

SSH 키 생성

ssh-keygen -t rsa -b 4096 -C “[email protected]

SSH 키를 ssh-agent애 넣기

eval “$(ssh-agent -s)”

~/.ssh/config 파일을 다음과 같이 만든다.
Host *
AddKeysToAgent yes
UseKeychain yes
IdentityFile ~/.ssh/id_rsa

ssh-add -K ~/.ssh/id_rsa

다음과 같이 SSH 키를 클립보드에 복사후 github 계정에 설정한다.

pbcopy < ~/.ssh/id_rsa.pub

Create Application & Add your first device

디바이스 타입에서 – 라즈베리파이 같은 보드를 선택
Add device를 클릭하고 위에서 선택한 라즈베리파이에 맞는 이미지를 다운로드 한다.

Provision your device

다운로드한 이미지를 Etcher로 SD로 굽는다.
라즈베리파이가 부팅이 끝나면 dashboard에서 확인이 가능하다.

Deploy code

코드를 하나 클론한다.

$ git clone https://github.com/resin-io-projects/simple-server-node.git

다음과 같이 remote endpoint를 추가한다. 주의) 여기서 USERNAME은 resin의 USERNAME이고, APPNAME은 위에서 생성한 Application 이름으로 대쉬보드에서 보인다.

$ cd simple-server-node
$ git remote add resin <USERNAME>@git.resin.io:<USERNAME>/<APPNAME>.git

다음과 같이 push를 하면 resin 서버에 코드가 업로드되고 기기에 코드가 적용이 된다.

$ git push resin master

대시보드의 모습

참고 – https://docs.resin.io/learn/getting-started/raspberrypi3/nodejs/


Iotivity에서 gerrit 설정

Iotivity에서 gerrit설정 및 git을 이용해 코드를 가져오는 방법

Step 1: linuxfoundation.org 에서 회원가입

Step 2: Create SSH keys

$ ssh-keygen -t rsa -C "Your name <your_email_address>"

~/.ssh의 위치에 id_rsa와 id_rsa.pub가 생성이 된다. 참고로 맥에서 숨김 파일을 보려면 SHIFT + CMD + .

Step 3: Setting up SSH

~/.ssh/config 파일을 다음과 같이 생성한다.

Host gerrit.iotivity.org
    Hostname "gerrit.iotivity.org"
    IdentityFile ~/.ssh/id_rsa
    User <Linux Foundation ID>
    Port 29418

Step 3: Upload SSH public key to Gerrit and Register personal info

IoTivity Gerrit에 로그인을 한후 Settings 메뉴에서 id_rsa.pub 파일의 내용 copy & paste 한다.

Step 4: Verify your SSH connection

$ ssh gerrit.iotivity.org

터미널에서 다음과 같은 메시지가 나오면 성공

****    Welcome to Gerrit Code Review    ****

Step 5: Clone code

$ git clone https://gerrit.iotivity.org/gerrit/iotivity
$ cd iotIvity
$ git clone https://github.com/intel/tinycbor.git extlibs/tinycbor/tinycbor -b v0.5.1
$ git clone https://github.com/ARMmbed/mbedtls.git extlibs/mbedtls/mbedtls -b mbedtls-2.4.2
$ sudo apt-get install autoconf libtool doxygen valgrind wget unzip libboost-dev libboost-program-options-dev libboost-thread-dev uuid-dev libexpat1-dev libglib2.0-dev libsqlite3-dev libcurl4-gnutls-dev

$ sudo apt-get install scons

참고 https://wiki.iotivity.org/how_to_use_gerrit


ESP32 개발 환경 설정 – Mac OS

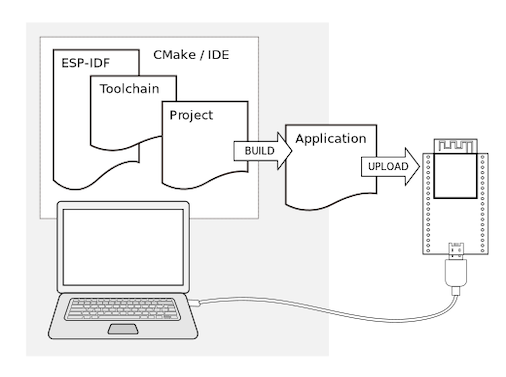
Mac OS에서 ESP32 개발 환경 설정은 다음의 링크를 참고한다.

Tool chain 설정

pip와 pyserial을 설치- 이 과정중에 dependency가 있는 라이브러리 설치는 sudo easy_install xxx  형태로 설치한다.

sudo easy_install pip
brew install cmake ninja dfu-util

다음은 툴체인을 다운로드하고, 설치를 하는 과정임

mkdir -p ~/esp
cd ~/esp
git clone --recursive https://github.com/espressif/esp-idf.git
cd ~/esp/esp-idf
./install.sh

환경설정

. $HOME/esp/esp-idf/export.sh

다음의 내용을  .bash_profile에 추가한 다음에 esp 개발시 터미널에서 get_idf를 실행하면 된다.

alias get_idf=’. $HOME/esp/esp-idf/export.sh’

추후에 리모트 깃의 내용을 업데이트 하려면 다음과 같이 한다.

cd ~/esp/esp-idf
git pull
git submodule update --init --recursive

프로젝트 확인

cd ~/esp
cp -r $IDF_PATH/examples/get-started/hello_world .

설정

cd ~/esp/hello_world
idf.py set-target esp32
idf.py menuconfig

빌드 및 다운로드

idf.py build
idf.py -p PORT flash monitor. // 빌드와 모니터링을 동시에

Monitor

make monitor

To exit the monitor use shortcut Ctrl+]


Pages:1234