:::: MENU ::::
Posts tagged with: Fritzing

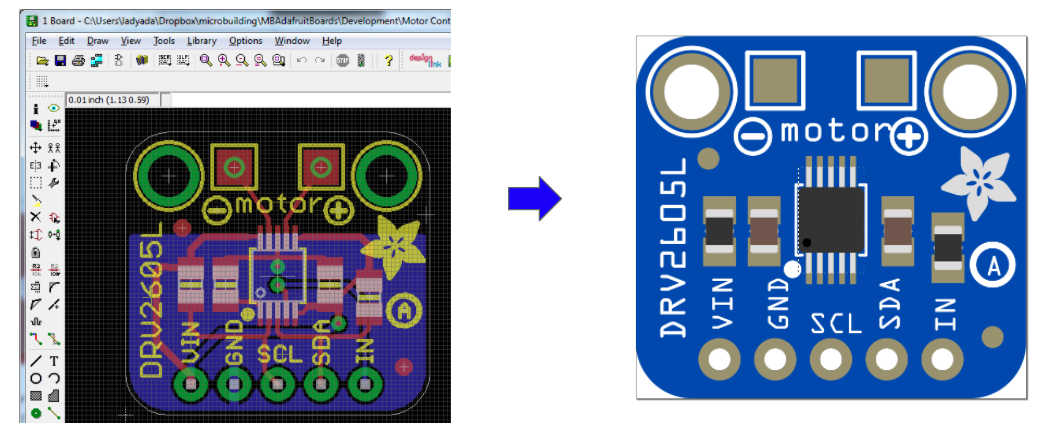
EAGLE 파일을 Fritzing 파일로 변환하기

1. 아래 repo를 깃헙에서 클론한다.

  • Fritzing

clone https://github.com/fritzing/fritzing-app

  • Fritzing parts

https://github.com/fritzing/fritzing-parts

  • eagle2fritzing

clone https://github.com/adafruit/eagle2fritzing

  • font download & install

http://fritzing.org/fritzings-graphic-standards/download-fonts-and-templates

2. eagle2fritzing의 brd2svg 빌드

  • 빌드시 xcode 9.2 가 필요하며, qt를 설치후 PATH 설정해야 한다.

brew install qt
cd eagle2fritzing/brd2svg
qmake -spec macx-g++ brd2svg.pro
make

  • make를 하면 brd2svg가 빌드가 되는데,

clang: error: linker command failed with exit code 1 (use -v to see invocation)

이런 에러가 발생하면, make파일에서 링크옵션에서 static을 제거하면 된다.

LFLAGS = -static -static-libgcc -static-libstdc++ -headerpad_max_install_names $(EXPORT_ARCH_ARGS) -Wl,-syslibroot,/Applications/Xcode.app/Contents/Developer/Platforms/MacOSX.platform/Developer/SDKs/MacOSX10.13.sdk -mmacosx-version-min=10.10 -Wl,-rpath,@executable_path/Frameworks

3. 사용법

  • run.sh  파일을 수정한다.
  • Eaglecad 위치설정
  • WORKPATH 설정
  • WORKPATH 아래 brds폴더를 만든후 여기에 board 파일을 위치시킨다. 즉 폴더의 구조는 다음과 같다.

     FOO
     |– brds
         |– board1.brd
         |– board2.brd
         |– board3.brd


온라인 공동 번역툴

온라인 공동 번역툴인 Crowdin

모든 것이 인터넷상에서 가능한 시대다. 번역도 마찬가지…

다국어 버젼의 소프트웨어나 문서를 다른 언어로 번역할때 유용할 것 같다.

화면 왼쪽에는 각 스트링의 기본언어의 표현이 나타나며, 빨강, 초록, 체크모양의 아이콘이 있는데, 각각은 미완료, 번역완료,확인완료 를 의미한다. 왼쪽에서 스트링하나를 선택하면 그 오른쪽 화면에 번역 작업을 할 수 있는 내용이 나오며, 매 문장마다 기계가 번역한 단어도 보여준다. 

오른쪽에 다른 사용자가 코멘트를 남길 수도 있다. 즉 온라인에서 관리 및 협업이 가능하다는 뜻…

마치 지난번에 Fritzing을 한국어 번역할 때 사용한 Qt Linguist 와 인터페이스가 거의 비슷하다.


Fritzing에 Wiz820io 라이브러리 공식 등록

Fritzing 툴의이 최근 버젼(0.6.4)버젼부터 지난번에 제가 만든 Wiz820io가 공식 라이브러리도 등록이 되었습니다.
이번 버젼에서 눈에 띄게 달라진 점은 part 라이브러리가 각 제조사별로 브랜딩되어 있습니다.
즉 Arduino, Parallax, Sparkfun등의 탭들이 생겨서 각 제조사 별로 부품을 찾을 수 있게 되어 있네요.
제가 만든 Wiz820io는 Core Parts에 Connection 항목에 들어가 있습니다.


아두이노 보드에서 W5200 사용하기

아두이노의 공식 Ethernet 쉴드에는 WiznetW5100이 사용된다. 따라서 모든 Ethernet 라이브러리는 W5100을 이용하는 것으로 되어있는데 Wiznet의 신규칩인 W5200을 아두이노 보드에서 사용하기 위해서는 라이브러리를 일부 수정을 해야 한다. W5100과 비교해서 W5200의 장점은 대략 작은 패키지, 8 socket 지원(W5100의 경우 4 socket 지원), Power down mode, Wake on LAN 기능 지원 등이다. 
    W5100 to W5200 migration guide


Hardware 연결
간단한 테스트를 위해 Wiz820io를 사용을 해서 아래 그림처럼 테스트를 했다. 아래 그림은 Fritzing 이라는 툴로 Wiz820io 라이브러리를 만든 후 작성한 연결도이다. Fritzing관련해서는 이전 포스트 참고(Fritzing, Fritzing 라이브러리 만들기)
    Wiz820io의 Fritzing 라이브러리


cfile28.uf.182202414EE59CB821A744.fzpz


* PWDN, nINT, 스위치를 통한 reset 입력은 연결을 안 해도 되고, VCC, GND도 하나의 선만 연결해도 된다.


라이브러리 수정
변경을 최소화하고 기존의 라이브러리와의 호환성을 위해 변경된 드라이버는 W5100과 같은 파일명을 쓴다. 즉 W5100.cpp와 W5100.h 파일만 수정해서 아두이노 IDE가 설치된 폴더에 덮어쓰면 된다. 즉 “/libraries/Ethernet/utility” 아래에 있는 W5100.cpp 및 W5100.h 파일을 아래 첨부한 파일로 변경하면 된다. 파일에 수정된 부분은 W5200으로 검색을 하면 쉽게 찾을 수 있다.


cfile23.uf.160404394EE5D0692C5B5D.cpp


cfile3.uf.177E62394EE5D06A33D119.h


테스트
아두이노의 IDE에서 File > Examples >Ethernet > 에 있는 예제를 열어서 컴파일 후 아두이노보드에 다운로드를 하면 잘 동작한다. 
최근에 릴리즈한 Arduini 1.0 에서는 기존 Ethernet 라이브러리가 좀 더 확장이 되었다.  http://arduino.cc/en/Main/ReleaseNotes 참고

* Support for DHCP and DNS has been added to the Ethernet library, thanks to integration by Adrian McEwen. Most classes in the Ethernet library have been renamed to add a “Ethernet” prefix and avoid conflicts with other networking libraries. In particular, “Client” is now “EthernetClient”, “Server” is “EthernetServer”, and “UDP” is “EthernetUDP”. A new IPAddress class makes it easier to manipulate those values.


* The UDP API has been changed to be more similar to other libraries. Outgoing packets are now constructed using calls to the standard write(), print(), and println() functions – bracketed by beginPacket() and  endPacket(). The parsePacket() function checks for and parses an incoming packet, which can then be read using available(), read(), and peek(). The remoteIP() and remotePort() functions provide information about the packet’s origin. (Again, thanks to Adrian McEwen for the implementation.)

Fritzing 라이브러리 만들기

Frtizing이라는 툴을 지난번에 소개한 적이 있다.  독일의 오픈 소스툴
이 툴을 직접 사용을 해봤는데, 실제 피지컬한 보드를 가지고 설계를 하는 듯한 느낌이 있고 이것을 다시 회로로 변환을 해주는 것이 흥미롭다. 전자공학을 하는 초보자들에게는 좋은 툴인 동시에 이미 많이 개발된 파트 라이브러리 덕에 문서 작업에 유용하게 쓰일 수 있다.
이미 아두이노, 아두이노 이더넷 쉴드, Xbee, mbed…등등의 파트들이 제작이 되어 있다.

자신만의 라이브러리를 만들여면 이미지 작업을 해야하는데, 이미 만들어 놓은 라이브러리를 수정해서 사용하면 좀 편하다. 이미지 파일은 벡터기반의 SVG포맷으로 만들어야 한다. 따라서 오픈 소스 툴인 InkScape를 사용하던지 상용툴인 어도비사의 일러스트레이터를 사용해야 한다. 구체적인 정보: http://fritzing.org/learning/tutorials/creating-custom-parts/

필자가 만들어본 WIZ820io Fritzing 라이브러리

아두이노 보드와 연결된 WIZ820io 회로


Fritzing

독일의 오픈 소스툴.
http://fritzing.org/

Fritzing is an open-source initiative to support designers, artists, researchers and hobbyists to work creatively with interactive electronics. We are creating a software and website in the spirit of Processing and Arduino, developing a tool that allows users to document their prototypes, share them with others, teach electronics in a classroom, and to create a pcb layout for professional manufacturing.


가상의 부품을 보드에 올릴수 있도록 해주고, 서킷을 만들어 준다. 이 내용을 가지고 문서를 만들기 편하게 해준다.
또한 Auto routing으로 PCB까지 제작을 할 수 있도록 해주는 툴이다.

오픈소스툴들은 초보자를 대상으로 점점 쉬워지고 강력해지고 있네요..