:::: MENU ::::
Browsing posts in: Development

Google fit, Apple HealthKit으로 부터 Health data 가져오기

Google Fit

여기에서 안드로이드 API나 REST API 관련 내용을 확인 가능

다음 4가지 데이터를 얻을 수 있음 (퍼미션 필요함)

  • Activity & Exercise — step count, burned calories, workout duration, basal metabolic rate, steep data.
  • Location — total running/cycling distance and speed as well as cycling cadence (RPM).
  • Body — heart rate, weight, body fat percentage.
  • Nutrition — food & hydration.

다음의 데이터는 OAuth가 필요함

  • Oxygen saturation
  • Body temperature
  • Blood pressure
  • Blood glucose
  • Cervical position and others

이런 데이터를 사용하는 것에 대한 Term & Condition

이중 몇가지 사항은
– Google Fit API를 사용한다고 해서 앱이 자동으로 HIPAA를 준수하는 것은 아니다..
– Google 피트니스에서 얻은 어떠한 콘텐츠도 판매하지 않으며 최종 사용자가 판매하도록 허용하지도 않는다.

Apple’s HealthKit

Apple은 개발자가 사용할 수 있는 총 3개의 키트를 제공

  • HealthKit — 건강 및 피트니스 데이터 컨테이너. 다른 앱과의 원활한 통신을 가능하게 하고 건강 데이터를 쉽게 저장, 교환 및 수집할 수 있도록 한다.
  • ResearchKit — 이 프레임워크는 연구 목적으로 많은 사람들로부터 의료 데이터를 수집해야 하는 경우에 유용함
  • CareKit — 장기 및 만성 질환 모니터링 및 관리, 수술 후 회복 등을 위한 프레임워크
  • 애플이 구글보다 더 많은 데이터를 모으고 있는데 full list는 여기에서 확인 가능하다.
  • Official pages of the iOS HealthKit framework

Garmin

Fitbit

STRAVA

Thryve

  • 찾아보니 애플, 구글, 삼성등의 디바이스로 부터 데이터를 가져와서 개발을 해주는 라는 회사가 있는데, “Get access to Thryve’s SDK and integrate 500+ wearables with your app” 이런 캐치프레이즈를 내걸고 있다.
  • https://thryve.health/api-doc/index.php#introduction

참고


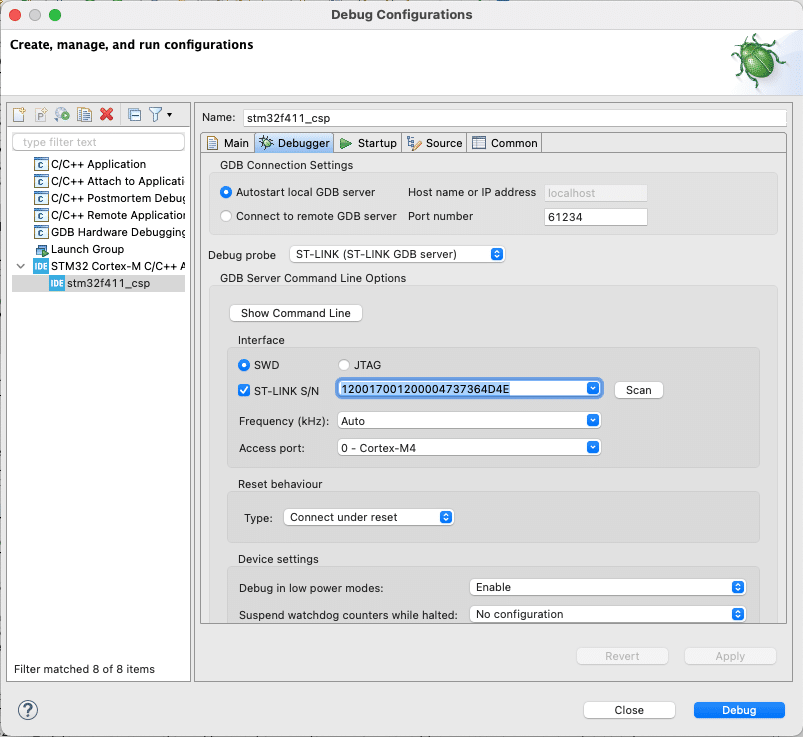
ST-LINK가 STM32CubeIDE에서의 오류

기존에 사용하던 ST-LINK가 있었고, 새로 구매한 ST-LINK를 연결해서 테스트를 하려고 했는데, 다음과 같은 에러 메시지가 보인다. ST-LINK의 펌웨어도 업데이트를 해보았으나 동일한 메시지가 계속 발생.

디버그 설정에서 보니 ST-LINK S/N 에서 Scan을 하면 자동으로 리스트가 업데이트가 되는 것이 아니라, 리스트 중에 하나를 수동으로 선택 해야하는 것.


nRF52 Segger Embedded Studio 설정 – CMSIS Configuration Wizard

노르딕에서 제공하는 예제코드의 경우 SDK 설정이 sdk_config.h에서 이루어 진다. 문제는 이 파일의 사이즈가 크고 #ifdef 등으로 설정이 되어 있어서 파일 자체를 보기가 불편하다. 그래서 이 설정을 쉽게 하는 툴이 제공이 되는데, 기본 SES 설정에는 없어서 따로 설정을 해야 한다.

  1. Go to File -> Open Studio Folder… -> External Tools Configuration.
  2. The tools.xml file will be opened in the editor.

다음의 코드를 삽입한다

<item name=“Tool.CMSIS_Config_Wizard” wait=“no”>
     <menu>&amp;CMSIS Configuration Wizard</menu>
     <text>CMSIS Configuration Wizard</text>
     <tip>Open a configuration file in CMSIS Configuration Wizard</tip>
     <key>Ctrl+Y</key>
     <match>*config*.h</match>
     <message>CMSIS Config</message>
     <commands>
         java -jar &quot;$(CMSIS_CONFIG_TOOL)&quot; &quot;$(InputPath)&quot;
     </commands>
</item>

참고 – https://infocenter.nordicsemi.com/index.jsp?topic=%2Fcom.nordic.infocenter.sdk5.v15.0.0%2Fsdk_config.html


ESP 빌드시 문제 해결

ESP32 가 빌드는 되는데 flashing이 다음과 같은 에러메시지로 안되는 경우

Traceback (most recent call last):
File “esptool.py”, line 57, in <module>
File “/Library/Python/2.7/site-packages/PyInstaller/loader/pyimod03_importers.py”, line 389, in load_module
File “serial/tools/list_ports.py”, line 29, in <module>
File “/Library/Python/2.7/site-packages/PyInstaller/loader/pyimod03_importers.py”, line 389, in load_module
File “serial/tools/list_ports_posix.py”, line 31, in <module>
File “/Library/Python/2.7/site-packages/PyInstaller/loader/pyimod03_importers.py”, line 389, in load_module
File “serial/tools/list_ports_osx.py”, line 32, in <module>
ValueError: dlsym(RTLD_DEFAULT, kIOMasterPortDefault): symbol not found
Failed to execute script esptool

기존 esptool을 esptool.py로 다음과 같이 변경을 하면 해결이 된다.

copy /Users/XXXXX/Library/Arduino15/packages/esp32/hardware/esp32/1.0.4/tools/esptool.py
to /Users/XXXXX/Library/Arduino15/packages/esp32/tools/esptool_py/2.6.1/esptool.py

chmod +x esptool.py

그리고 /Users/XXXXX/Library/Arduino15/packages/esp32/hardware/esp32/1.0.4/platform.txt 파일을 열어서 다음과 같이 수정한다.
tools.esptool_py.cmd=esptool -> tools.esptool_py.cmd=esptool.py

platform.txt 파일을 수정하고 Arduino를 재시작


SPI 핀 네이밍

마스터, 슬레이브의 이름에서 주는 주종관계 때문에 그동안 별 의식없이 쓰여왔던 이름들이 바뀌었다.

MOSI – COPI

MISO – CIPO

이 2가지만 기억하면 될 것 같다.

New signal names:

  • SDO – Serial Data Out. An output signal on a device where data is sent out to another SPI device.
  • SDI – Serial Data In. An input signal on a device where data is received from another SPI device.
  • CS – Chip Select. Activated by the controller to initiate communication with a given peripheral.
  • COPI (controller out / peripheral in). For devices that can be either a controller or a peripheral; the signal on which the device sends output when acting as the controller, and receives input when acting as the peripheral.
  • CIPO (controller in / peripheral out). For devices that can be either a controller or a peripheral; the signal on which the device receives input when acting as the controller, and sends output when acting as the peripheral.
  • SDIO – Serial Data In/Out. A bi-directional serial signal.

Deprecated signal names:

  • MOSI – Master Out Slave In
  • MISO – Master In Slave Out
  • SS – Slave Select
  • MOMI – Master Out Master In
  • SOSI – Slave Out Slave In

Signal names unchanged:

  • SCK – Serial Clock. The clock for the bus generated by the controller.


파이썬을 사용한 실시간 데이터 그래프

아두이노에도 데이터를 실시간으로 plot하는 기능이 있지만, 오토스케일링 기능 때문에 가끔 불편할 때도 있다. Python Playground 책의 저자의 블로그를 보니 실시간으로 시리얼 데이터를 받아서 mathplot을 사용해서 그래프를 출력하는 프로그램이 있어서 사용해 봤다.

사용법: python ldr.py –port [port]

VS Code에서 파이썬 코드를 디버깅할 때 인자를 입력 빋아서 디버깅하는 방법이 있는 것 같아서 구글링을 해보고 tasks.json파일을 수정해서 해봤는데, 잘 안되어서 코드를 수정해서 테스트를 했다. 원래 사용법은  위 사용법처럼 포트명을 입력을 해야 함.


PlatformIO, Arduino에서의 핀매핑 정보

펌웨어 개발을 할때 MCU의 I/O핀을 맵핑해서 사용을 하게 된다. 아두이노의 경우에는 실제 HW 핀 매핑을 MCU 벤더에서 제공하는 것 처럼 low level로 access하지 않고, 보드의 실크에 적혀있는 핀 번호로 access할 수 있도록 추상화를 해 놓았다. 실제로 핀 매핑이 어떻게 되는지 보려면 맥의 경우 $HOME/라이브러리/Arduino15/packages 아래에 각 플랫폼 별로 되어 있는 폴더를 확인해 봐야 한다. 예를 들면 adafruit의 경우 /packages/adafruit/hardware/nrf52/0.21.0/variants/feather_nrf52840_express/variant.h파일과 variant.cpp 파일을 확인해 보면 된다.

PlatformIO도 아두이노와 마찬가지로 VSCode에 설치를 하면 맥에서는 $HOME/.platformio/packages 폴더 아래에 각각의 프레임워크에서 사용하는 bootloader, library들이 설치가 되어 있다.


Pages:1234567...24